Thursday 16 August 2018

The Glorious Path to Verminhood

The road goes ever on...

In my last post I spoke at length about how I was getting back into Age of Sigmar via the Path to Glory campaign system.

Well, I've made some progress both in the campaign and with painting up my growing warband, so let's jump straight in with some pictures!

Mouldering beasts!

I'll come right out and say it - I love clan Moulder.  For those of you not familiar with Skaven clans, they're the disgusting flesh crafters who are responsible for breed grotesque (and deadly!) rat based monstrosities which are sold to warlords for exorbitant amounts of warpstone...

My love of Clan Moulder has led to a number of large beasties in my Skaven PTG Warband.  I always find that prepping for games / campaigns helps keep me focussed on getting things finished and this particular campaign is no different as I'm munching my way through painting my hideous rat beasts! 

Behold the gnashing, screeching fruit of my labours so far!


My beautiful beasties....


My Packmaster with his faithful pet Wolf rat pup


Do you have a hideous malformed twin?  Try new laser rat removal!


Sloth love Chunk!


It started as a pimple and he scratched it...

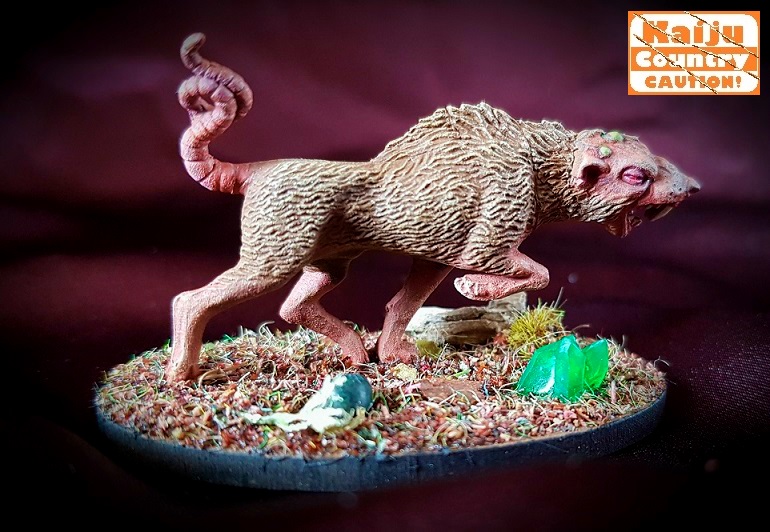
The ad said Golden Retriever...


MY NAME IS TREVOR!  I LIKE ASTRONOMY!  WHY ARE YOU RUNNING?!


Where is everybody?
Running with the Wolf rats


My objective token!
 

So what the hell happened next?!

In short, I won my battle against Albie - read on if you want the longer version!

Setup

We randomly selected a Battleplan from the Path to Glory book and it turned out to be Cornered.  It's a fun scenario, where a group of raiders get caught with their pants down while they're pillaging.

Surrounded and with only half of Santa's normal elf quota, the general has to escape the board before being bludgeoned to death by the attacking force.

Albie lost the roll off and ended up as the raiders - he split his force in two and I picked half for him to deploy with his general in the middle of the board.  The rest of his force didn't get to bathe in the blood of their enemies today and were had to watch from the side lines.

Once Albie's units were placed, I could set up anywhere on the board no more than 6" from the table edge.

I set up my forces pretty evenly and hoped that I would be able to slow down the general enough to catch him with one of my big hitters and cave his head in...


Deployment
Albie got to take the first turn.  Now, I had made a rather critical error during setup.  Thinking only about how my Skryre Acolytes and Arch Warlock  would pepper the enemy with poison wind orbs, magic and warpfire, I forgot that Albie wouldn't stand in the middle of the board and let me kill him...

Khorne turn 1
Somewhat inevitably, Albie walks around the building with his Bloodreavers and easily beats my Skaven Acolytes to death.  They never stood a chance!

The Khorgorath made its hideous Cronenberg-esque bone tentacle shooting attack against the Hellpit Abomination causing only a single wound.  The Khorgorath then failed his charge.  The Hellpit Abomination simply thumbed his nose and limbered up for lunch time.

The Bloodsecrator stayed where he was and open the skull portal, granting his mates an extra attack each in the combat phase.

The General and Blood Warriors charged towards my very lonely looking Arch Warlock and I was pleasantly surprised when he only took a single wound thanks to his heavy armour granting him a hefty 3+ save!  In response, he sliced a Blood Warrior in half with his Stormcage halberd!

At this point, I was on the back foot and worried about how long my Arch Warlock would feasibly be able to hold up the frothing Khorne maniacs...

Skaven turn 1
I needn't have worried as pretty much everything went in my favour during my first turn!

During my Hero phase, my Arch Warlock failed to cast Arcane bolt, but then miraculously pulled off a Warpstorm casting keeping me very much in the game as it caused a Blood Warrior to fall down dead, the general took a mortal wound and the Bloodreavers lost 2 men!  In the shooting phase, my Arch Warlock also bathed the Khorne Lord and his Juggernaut in Warpfire causing another nmortal wound!

The Rat Ogres stomped forward and made an 11" charge into the surprised looking Bloodreavers!  The Packmaster ambled along behind, with his aura ability just out of range.  I'd hope he was cooking up some devious plan, but it's more likely he was hoping most of the fighting was done by the time he got there...

My trusty Wolf Rats stormed forward, running an additional 2" on top of their 12" move.  If my Arch Warlock could hold out for one more turn, then the Wolf Rats could intercept Albie's general.

The Hellpit Abomination didn't disappoint, utterly crushing the Khorgorath in a single messy barrage of attacks.  You could say that Albie's plan to hold up the Abomination was not really working...

A lot of people say that rat ogres are rubbish - I completely disagree!!  In this game, they absolutely brutalised Albie's Bloodreavers!  Due to getting the charge and rolling a couple of 6's, they got two additional attacks and proceeded to rip 8 terrified looking Bloodreavers to bloody pieces! One rat ogre was reduced to a single wound in response.

Despite taking two more wounds, my Arch Warlock still managed to punch out another Blood Warrior in the combat phase.  The fact that most attacks appeared to bounce off his armour made me start to hope that he'd survive Albie's next turn too and cast another juicy Warpstorm!

Khorne turn 2
The Bloodsecrator appeared oblivious to the Hellpit abomination dragging its hideous meaty form up behind him.  The skull portal remained open, but only the general and Bloodreavers were still in range of its aura effect thanks to attrition shrinking the Blood Warrior unit!

Despite my hopes for the mighty Arch Warlock's survival, he was unceremoniously crushed to death by the Khorne Lord's Juggernaut in the combat phase before he could even think about squirting the musk of fear!

All of the Bloodreavers aside from the champion and standard bearer were gobbled up by the apparently unstoppable rat ogres!  They did manage to bring down one rat ogre and severely wound the remaining beast during the combat.  Thanks to the stalwart Bloodsecrator, they didn't run off this turn.

Skaven turn 2
As planned, the speedy Wolf Rats easily moved up and charged the now unengaged Lord of Khorne and Bloodwarrior - they wouldn't be escaping this turn as only a single Wolf Rat died after they caused several wounds on the Lord and his Juggerbeasty.

Unsurprisingly to everyone, except the Bloodsecrator (I suspect he had his headphones in), the Hellpit Abomination barely broke step as it messily turned the Bloodsecrator to paste!

The remaining Rat ogre casually ate the last two Bloodreavers, sniffing the air and turning towards the Wolf rat combat with a hungry look in its pitiless red eyes...

Meanwhile, the Packmaster came round the corner of the building whistling the sun has got his hat on with his hands in his pockets.

Khorne turn 3
The loss of the Bloodsecrator to the combination of mutant rat monster and Thrash Metal in his earphones, the Lord of Khorne was starting to look extremely sweaty and nervous.  That may be why he fumbled his axe, only managing a single wound on an already injured Wolf rat, sending him to the big sewer in the sky.  The Blood Warrior did nothing.  Literally nothing.  He'd better hope Khorne was catching up on Downton Abbey instead of watching this battle...

Skaven turn 3
The surviving Rat Ogre charged into the Khorne Lord, then the Hellpit abomination let out a spine chilling screech as it tumbled forward in an avalanche of flesh, making my second 11" charge of the game!  The bloody Packmaster continued his stroll , ending up just outside of charge range, but conveniently in range of the empty townhouses which most assuredly would contain cheese.

With zero self control, the Hellpit abomination utterly destroyed the Lord of Khorne, emptying his contents out on the floor before gobbling up the offal.  The wounds caused would have been enough to kill him twice over at full health!  Maximum deletion occurred.  Meanwhile, the remaining Blood warrior hid at the back, a loose bowel movement trickling out of his trousers.  Crouching down, he started making what he thought were friendly squeaking noises.

Clean up on aisle 7!!

This was probably my favourite game of AoS 2.0 so far!  My botched deployment almost lost me the game on turn one, but I managed to pull it back with a combination of luck and excessive violence from my Moulder beasties!!  I felt a bit sorry for Albie when the Hellpit Abomination completely wrecked everything it touched, taking only minor injuries then immediately healing itself at the start of each of my turns!  He's my MVP without a doubt!

The dice were with me again when I rolled for my glory and came away with another 3, bring my total so far to 7!  I chose to spend one of my glory points to boost my next post game pick - a trio of Stormfiends!


What really won me the game!  Rat catcher dice for Guild ball - perfect for Skaven armies!

Here are the scores on the doors:

Lee (Skaven) - 2 wins, 1 loss.  6 Glory
Tom (Beastclaw Raiders) - 2 wins, 1 loss.  3 Glory
Albie (Khorne Bloodbound) - 1 win, 1 draw, 1 loss.  4 Glory
Sam (Stormcast Eternals) - 1 Draw, 2 losses.  3 Glory

Despite the difference in battle outcomes, the glory scores are still pretty close and it could all change pretty quickly!

It's all still to play for and I can't wait for my next game!

TTFN...

Thursday 9 August 2018

AoS 2.0, Skaven and the path to glory...

The trees stir and vermin pour forth...

Having worked solidly on my Imperial Knights for a couple of months, I decided that it was time to take a break from giant robots in the 41st millennium and revisit an army which I have neglected for far too long...

In the wake of the Age of Sigmar 2.0 release, shockingly, I am making more of an effort to actually play some games!  I'm happy to report that I have started an Age or Sigmar Path to Glory campaign with a few friends at our local gaming centre in Sheffield, The Outpost (As well as giving a flat 20% discount on GW products on the web and in store, they also have a pretty large gaming area with tons of terrain to choose from!).

For my faction, I chose Skaven as I have a lot of miniatures which I've lovingly crafted then left to gather dust in the garage as I ran out of steam on the project.  Being a typical model maker / collector, I tend to get easily distracted by shiny things.  If I were in Lord of the Rings, I'd love to think I'd be Aragorn, but realistically I'd be Gollum; crawling around in a dirty cave with my collection of stuff covered in my own filth.

In fairness, the end of the WFB world and the advent of the Age of Sigmar also killed off my motivation to finish them as the thought of rebasing and reorganising an army while the fledgling game system was still in flux didn't exactly fill me with joy!

As such, my partly assembled Skaven army lay unpainted and requiring attention!  I did have a brief liaison with the Sylvaneth faction when GW ran the Malign Portents campaign.  Unfortunately, the campaign wasn't particularly well supported and I lost interest after a couple of months.  The result was a small Sylvaneth army and a converted Lord Ordinator:


The Forest Awakens!
BranchWych.  Doesn't fear the reaper...
Each Sylvaneth model in my army has a different animal spirit guide - inspired by Phillip Pullman's epic 'His Dark Materials' trilogy.  See if you can spot them all!
Branch Nymph - ready for her close-up...


My autumnal Treelord with his 3 wise owls...
Malign Portents Lord Ordinator.  Helping the trees get ready for hammer time...


One good thing which came out of this short-lived exercise in army building (apart from a battle ready army in a relatively short space of time!) was the fact that I played my first couple of Age of Sigmar games and thoroughly enjoyed them!  In retrospect, the Sylvaneth probably weren't the best choice for a starting army as their rules are complex and situational.  This is especially true with the placement of woods and the stacking of powers to fully utilise them.  That said, as I'm entirely driven by the models rather than rules, I doubt I would have made a different choice!  But I digress...

The Path... To Glory!!

Now that Age of Sigmar has been freshened up, streamlined with 2.0 and more recently expanded with the amazing new Malign Sorcery add-on, I thought it was time to dive back in!  I picked up the Path to Glory book as I thought it would be a good way to encourage me to pull my finger out of my butt and get some Skaven units finished!

If you're unfamiliar with Path to Glory, I would highly recommend giving it a try as it's a nice way to break into AoS or a new army because it provides a basic framework for gaming and expanding your warband.  It's flexible enough that you can add in unusual units like Forgeworld models without breaking the campaign whilst still remaining fairly balanced on the tabletop.  The games start small with only a General and a few units each then as the campaign progresses, you can upgrade units or characters and add units to your army.  Perfect for someone requiring motivation to get things finished!

Including myself, we have four players in our little campaign.  It's a friendly, easy going group of new players / players with new armies, so it works perfectly as we all get to grips with the rules together.  To be brutally honest, competitive play turns me off completely.  I prefer to play friendly narrative games where I can play at my own pace without the pressure of winning at the cost of fun!

I'm playing Skaven, Tom is using Beastclaw Raiders, Albie is taking Blades of Khorne and our newest player is Sam with Stormcast Eternals.

My intention is to report back on how we all get on with our endeavour and what our opinions are on Path to Glory, AoS 2.0, our armies and the use of Malign Sorcery (which we've agreed to allow the use of as a 'pick' instead of a new unit).

At this point, we have organised our forces and played our first few games.  I started with a Skaven Arch-Warlock which is a solid choice for my General as he has a single use Warpfire thrower, nasty close combat attacks and some solid magic ability, being able to cast twice and unbind one spell per turn.  Accompanying him was a Hellpit abomination, a unit of two rat ogres and a packmaster.  I played Tom's Beastclaw Raiders in my first game.  We decided to use games from the PTG book in this first session as they are great for smaller games; we rolled the rewards of Chaos which gives buffs from 4 corner located shrines.

The shrines played no part in the battle which was short and brutal!  I feel I was extremely lucky not to get completely stomped in this game!  I rolled high for mortal wounds with spells and my warpfire thrower, managing to wear down Tom's Huskard Stonehorn enough to (only just!) batter him to death in combat with my hellpit abomination whilst it was distractedly chewing on the remains of my poor old rat ogres!

I cannot stress enough how terrifying a Stonehorn is - and that was a huskard, not a Frostlord!  Tom's Mournfang riders didn't take as much killing, but they are still as tough as nails!  After the battle, Tom used his 'pick' and his only glory point to add two more Mournfang riders and I chose to stash the 3 glory points I'd earned and chose to bring in my 6 Wolf Rats (although they are Monstrous Arcanum units, everyone was happy for me to use them as a normal 'pick' for my force).  I hoped that their massive 12" moved would help me to manoeuvre around the board a bit quicker in future games.

The second game Tom and I played was Lair of the Beast which I think is an amazing scenario where you are both attempting to slay a chosen monster in the centre of the table and then claim its eggs so that you can raise the baby creature as part of your warband!

In preparation for this scenario, I pulled together 4 different beasts and made 4 unique nest markers for them.  The beasts up for grabs are a Cockatrice, a Hydra, a Griffon (which you may recognise from a previous post!) and finally, a Dragon Ogre Shaggoth.  I will post some pictures of the beasts and their nest markers in the near future!  I love adding a bit of narrative flare to games, as I feel it really enriches the game and encourages creativity in the group. 

Tom and I rolled for the beast and it turned out that we would be battling for the fate of a Cockatrice.  To say that the battle was short would be a massive understatement.  Tom won the first turn roll off and proceeded to carry out a first turn death charge on the unsuspecting Cockatrice with his Stonehorn ending the game after only three dice rolls!!

While Tom's Huskard was picking Cockatrice guts out of his Stonehorn's hoofs, I made my second 'pick' in preparation for my next game in the campaign.  In the end, I settled on a unit of 8 Skryre Acolytes as they have a fairly nasty short ranged shooting attack which they can use without needing line of sight - perfectly in keeping with my cowardly Skaven!

Albie and Sam played their first scenario which turned out to be an utter bloodbath.  Where Tom and I tore lumps out of each other's small monstrous units, Albie and Sam rolled the Sacrifice scenario, leaving poor old Sam with the unenviable task of trying to rescue a character from behind a wall of 30+ bloodthirsty Khorne warriors!

Although he accounted for almost all of Albie's foot troops in a hellish melee, he was unceremoniously run down by Albie's Juggernaut riding Skullcrushers.  In all honesty, it was like watching an articulated lorry drive through a petting zoo!

In conclusion, I am very much looking forward to our next session; the Path to Glory rules are great fun and easy to follow.  I like that the games start small, giving you a chance to get used to your ruleset, slowly adding to your warband at a pace where you don't feel overwhelmed with rules.

We are hopefully going to play some more games next week and I intend to make another post shortly after including some actual pictures!

What comes next...

As I already have a decent sized Skaven collection, I wanted to add something new and unique to my army as a centrepiece.  I decided on adding a Monstrous Arcanum Brood Horror to my army, but I have never really been a big fan of the official miniature.  As such, I decided that I would use some spare components (and a lot of putty) to make my very own disgusting rat monster!  Below is a sort of diary covering my progress so far - I've noted down some tips for anyone thinking about attempting a larger sculpt such as this one - enjoy!

Stage 1

Initially, I looked closely at rat skeletons to get the right internal structure for my beasty.  I put together a bone frame using wire (I find flower arranging wire is perfect) and then shored it up with a pure Milliput core.  I use Milliput as a core for two main reasons - it's very cheap for bulking out your initial shapes and it's hard as rock when fully cured.  This helps to avoid any retardation from handling while you are sculpting.  At this point, I added a few spare parts from my bits box which I think really suited what I was trying to achieve with the model...

Basic shape over wire skeleton
The shapes are pretty rough, but the cured putty keeps the model nicely locked in position
I knew those Boneripper spares would come in handy!
 
Stage 2

The next stage was similar to the first, with more bulking, but with more attention to the rat's muscle groups and the intended final look.  This may be an obvious point to make, but I'll say it anyway!  NEVER TRY AND DO THE WHOLE THING IN ONE GO!  If you try to sculpt the whole thing in one sitting, the putty will shift, dent, delaminate and you'll end up with a mess and a feeling of major disappointment.

Attack the project in stages; get the skeletal form right, put on enough putty to secure all of the wire components and make sure that they don't shift, then bulk out the overall form of the model, trying to render the basic muscle groups without surface detail.  When you carry out this stage, you should be looking to leave 2 - 3mm of surface area to add in your detail layer once Stage 2 has fully cured.

In terms of putty, I still used Milliput at this stage, but added in some greenstuff to the mix.  The reason for this is twofold.  It adds stretchiness to the Milliput (which is prone to tearing in its pure form) while also tempering its stickiness.  It also makes a bulkier more pliant mixture than Greenstuff on its own (which I find too hard and resistant for large models).  Generally, I make a 50/50 Milliput batch and mix around a third of that volume in greenstuff separately before mixing the two elements together.  Make sure that you fold and knead the mixture so that you have an even (not stripey) mix before sculpting with it.

As I was starting to form the creature's flesh, I also used some more real life reference in the form of the naked mole rat.  A creature so hideous that making it into an actual sausage would probably be an improvement!

I salute you nature, for you have created something more hideous than I ever could...


When you've gotta go...
 

Stage 3

Now we're starting the first detailing phase, which is where all of the hard work starts to pay off and you get to make some lovely basic surface details!  For this stage I use a different putty mix altogether.  I'd normally use pure Greenstuff or ProCreate putty, but as there was still quite a lot of surface area and bulking to do, I made up a mix of equal volumes 50/50 Milliput and 50/50 ProCreate.

The reason for this is simple.  ProCreate is an amazingly versatile putty which has the best properties which I personally rate as the best on the market.  It's one major problem is... it's bloody expensive!!  It costs approximately 4-5 times as much as the same volume in Milliput, so I use it sparingly in it's pure form where I need to pick out extremely fine detail.  The rest of the time, I settle for a mix to try and make it go further without compromising too much on detail...


Stage 4

Stage 4 will involve adding more fine detail such as the claws, better skin texture, minor gap filling and the addition of the rider and a suitable base.  I'm hoping to finish this stage before my next post where I will provide a progress update!

TTFN!!