Previously on the Road to Golden Demon...
In my last post, I spoke about what I'd be entering into Golden Demon this year. Now I'd like to show you the finished entries and talk about them and the event briefly.
In the end, I completed all of my entries, submitting 7 pieces (listed below) on the day. Although I didn't take home a trophy, I was very pleased to get a Finalist Pin for my Mollog's Mob entry.
To be completely honest, I was surprised I even came away with that as both the quality and volume of entries was absolutely staggering!
1). 40k Large Model: Genestealer Carnifex
2). 40k Vehicle: The Fisher King
3). AoS Large Model: The Frost Giant
4). AoS Unit: Mollog's Mob
5). Middle-Earth Model: Sauron the Necromancer
6). Diorama: Throgg Vs Karanak - Khorne's Vengeance
7). Dual: Titanicus Scale Imperial Knight Vs Gorkanaut - Clash of Iron
 |
| My Golden Demon 2019 entries just before setting off for Warhammer fest! |
As I've covered them several times in the past, I won't go over my first three entries again - you can find them easily with my blog tags.
I'd like to run through entries 4 to 7 though, with some nice images of the completed miniatures and a few WIP pictures for the ones I haven't shown on the blog before.
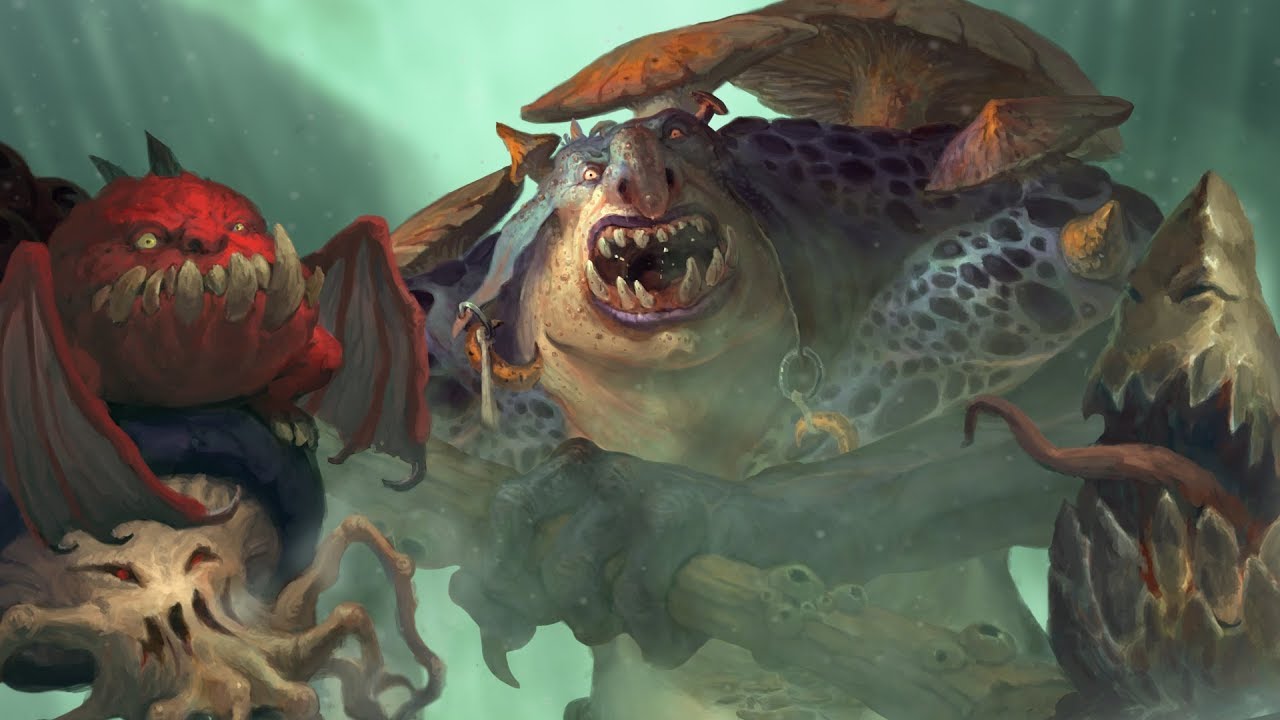
Age of Sigmar Unit: Mollog's Mob
I love to make things; that much is obvious. I think I'm pretty damn good at it. Unfortunately, my painting is distinctly average. As Golden Demon is primarily a painting competition, taking home anything at all was going to be a big ask for me.
So, imagine my delight when I received a Finalist pin for Mollog's Mob! I worked so hard on these guys and I'm really glad that was recognised! For anyone not familiar with the Golden Demon awards, there are trophies for Gold, Silver and bronze, then a small number of finalist pins (normally 2 or 3 per category) for people who made the final cut, but didn't quite make the trophy shelf!
 |
| Kevin Chin's original Mollog cover image is just amazing and was hugely influential when I came to choosing Mollog's paint scheme |
 |
| I wanted Mollog and his minions to be framed in a cave setting to really capture their troglodytic lifestyle! |
 |
| The entire box scene was made from scratch with inserts for each character. The addition of skulls, mushrooms and slime pools tied everything together nicely. |
 |
| At Warhammerfest, Seb Perbet described Mollog to me in what I believe is the best way ever - he's the king of the morons! A Troggoth so stupid that only complete fools would |
 |
| Although it's difficult to see in these pictures, I extended the patterning on Mollog's skin well beyond the etched surface. The whole model was a joy to paint and I'd highly recommend the kit! |
 |
| Mollog the Mighty! Mightily stupid maybe... |
 |
| Bat Squig! |
 |
| Stalagsquig! |
 |
| Spiteshroom! |
 |
| Prolonged exposure to Dankhold Troggoths can yield unexpected pin badges and fungal growths... |
Middle Earth Category: Sauron the Necromancer
I showed this entry as an early WIP in my last post; below you can see some completed images. I feel that this entry never quite came together the way that I had originally envisaged in my mind's eye.
I originally wanted to sculpt fire out to the edges of the arch to make the eye of Sauron with the actual model as part of the flaming effigy. This idea had to be scrapped because I was running very low on time. As you can see, the final entry just didn't have the gravitas I was hoping for and I wasn't surprised that I didn't place with it.
Diorama: Throgg Vs Karanak - Khorne's Vengeance
 |
| Throgg fends off Karanak, Khorne's Hound of Vengeance amongst the red dunes and boulders of meteoric iron in Chamon, the realm of metal while the fate of those who fall to Khorne's wrath is revealed below the desert sands... |
This piece was a labour of love from start to finish. I had always wanted to paint Throgg the Chaos Troll King since it was released around a decade ago. It was only when Games Workshop offered him briefly as a soon to be retired miniature with their made to order service that I decided to pick him up for a Golden Demon entry.
Finding someone or something for Throgg to do battle with wasn't easy - he's a large model and his pose is normally rather static. When the new plastic Karanak sculpt was released as part of Wrath and Rapture, I snapped up a spare which a friend had after buying two copies of W&R.
I estimated that Karanak would be roughly the right size and that with some tweaking to Throgg, a scene with the two grappling for supremacy could be engineered! I carefully cut the stone hammer from Throgg's foot and moved it to his raised hand, re-sculpting the haft and flat top edge to make it look as though the previously idle maul was now swinging through the air towards Karanak!
But Throgg wasn't having everything his own way as Karanak's bloody mouths and his savaged forearm show...
 |
| The detail in this miniature is simply amazing. The chompy mouths are just awesome! |
 |
| To offset the removal of the hammer, I built up a sand dune over a huge skull for Throgg to stand on as he grapples with Karanak |
 |
| Aside from adding gore to the mouths, Karanak needed very little alteration. Again, this kit was a joy to paint with the intricate scaling and Khornate symbols cut into his flesh. I decided to paint his fur as flames to make him a more intimidating foe for Throgg! |
 |
| I loved painting this cloak. Tiny thread veins on the inner and outer surface are hard to see in these images, but the large flat areas really allow for these sorts of detail to be added. I hate the axe in his shoulder though. I must have snapped the shaft at least 5 times... |
 |
| In this image, you can see the strings of gore on Karanak's three gaping mouths and the metallic boulders propping up chaos detritus which has been left to the desert sands... |
 |
| The skulls of worthy foes claimed by Khorne tumble through reality until they emerge through the flaming sockets of giant stone skull pillars jutting from a lake of burning blood... |
 |
| ...trophies for the God of War! |
Dual: Titanicus Scale Imperial Knight Vs Gorkanaut - Clash of Iron
Although this piece didn't place (it was originally intended for the small scale category, but was moved to the Duel category instead), it got a lot of attention on the day. People genuinely couldn't believe that I was made enough to make the Gorkanaut from scratch. Well, below are the WIP images to prove my insanity! :)
 |
| The Gorkanaut, base and building were all scratch built. Even the Knight had to be re-posed! I altered his legs, arms and shoulder pads to give the illusion of him running at full pelt towards the slower Gorkanaut! |
 |
| Steaming round a blown out building, a Knight of the noble House Raven prepares to crash into a hellish Ork contraption! |
 |
| Painting this Knight gave me such a headache! I used a selection of transfers to faithfully replicate his 40k scale brethren's heraldry. I took them mainly from the Armiger decals, but also borrowed from the Mechanicus infantry sheet as well. The tilt shield and hull symbol were painstakingly cut down in size from the Armiger hatch emblems. It took ages, but was totally worth it! |
 |
| Painting the Gorkanaut was pretty straight forward as I simply copied the 40k scheme including the chequer pattern on the hull which looks great in this scale! If you look carefully, you can make out faces and patterns on the missiles... |
 |
| I was quite pleased with the exhaust array despite gluing my fingers together several times trying to get them to sit correctly! |
 |
| The Gorkanaut picks his way over a crater while an Imperial Knight charges at its flank... |
 |
| I like this image as you can see just how tiny and detailed the finished Knight really is! |
 |
| The completed Gorkanaut before painting |
 |
| Again, this is a great WIP image as it shows just how tiny the Gorkanaut is! |
So what's next?
Well, I have 1.5 28mm scale Warhound Titans to complete before the Titan Owner's club walk in June.
Although the hounds will be my main focus for the next month, painting Mollog and Throgg really gave me the urge to create a Gloomspite Gitz Troggoth army so that I can play some casual games of Age of Sigmar. Below are some WIP images of my first Fellwater Troggoth - he's nearly finished and has some friends on the way too!
Until next time fellow Troggoth Herders, fare well and don't eat the purple shrooms!