The Saga Continues!
 |
| Ira Metallum marches ever onward towards completion! |
Welcome back for another mega update on the Imperator titan build project. It's been quite some time since I posted on the subject, so there is a LOT of progress to post.
I've put a few of the latest pictures at the start of the post for those of you that can't be bothered to scroll through over a hundred WIP images!
For those of you that reach the end of the post... well done, you've made a tedious man very happy! 😂
Overall progress and some interesting tidbits
Project time logged to date: 2.5 Years
Current Titan leg / Base / Pelvis combined weight: 17.5KG
Projected Titan weight once completed: 30KG
Projected Titan height from base to top of missile tower spires: 5 feet / 152cm (2.5 Warlord titans)
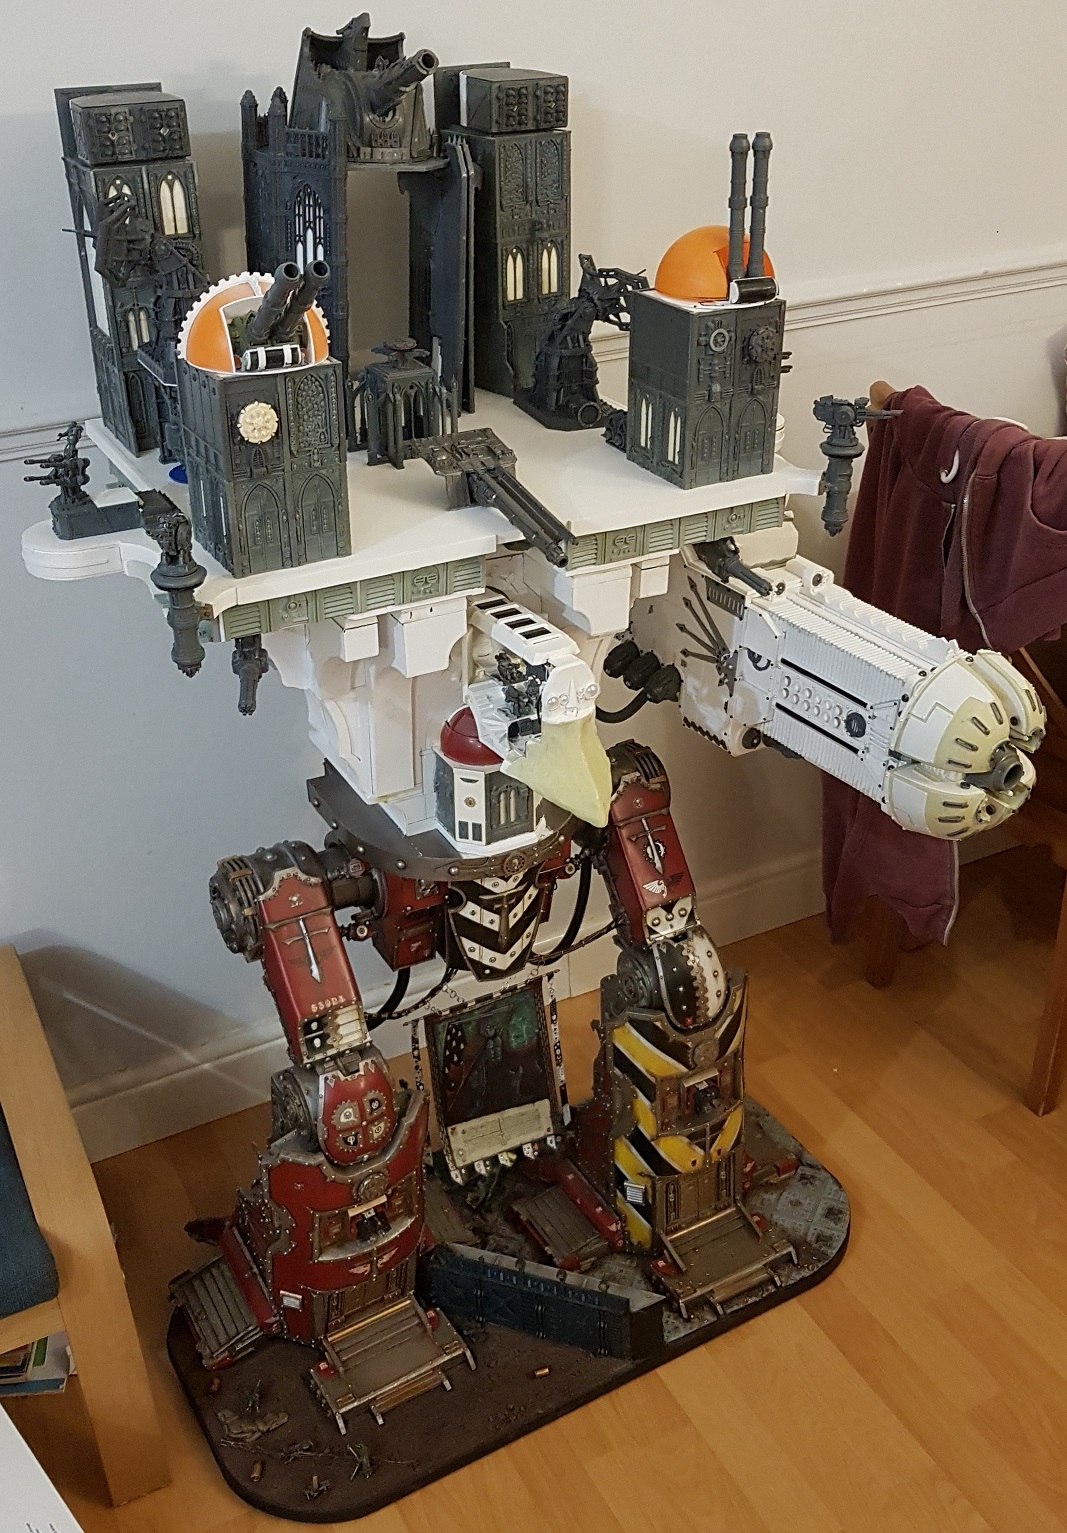
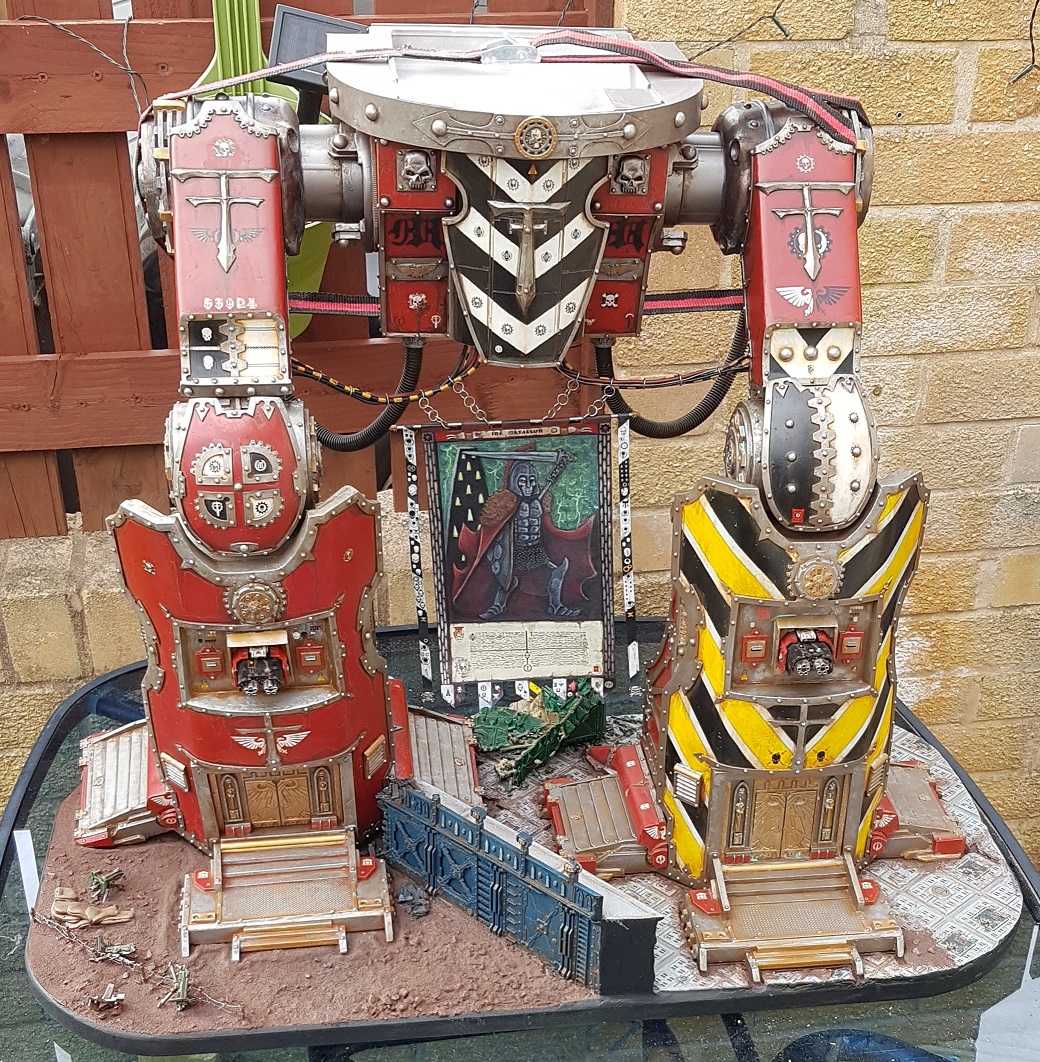
As you can see from these images, Ira Metallum now has fully painted legs and base. This was necessary in order to get the legs locked in place with the pelvis and base to create one solid structure. By contrast, the body, arms, head and carapace are very much still in progress!
The Starshatter Plasma Annihilator arm is almost complete, requiring some minor detailing and filling.
The head is taking a while to complete as it had to be built around a fully detailed interior. The core of the exterior structure is coming along, but requires a significant amount of build work as it will still need to come apart to show the inner crew. This is actually pretty hard to achieve as you have to mechanically lock the components together.
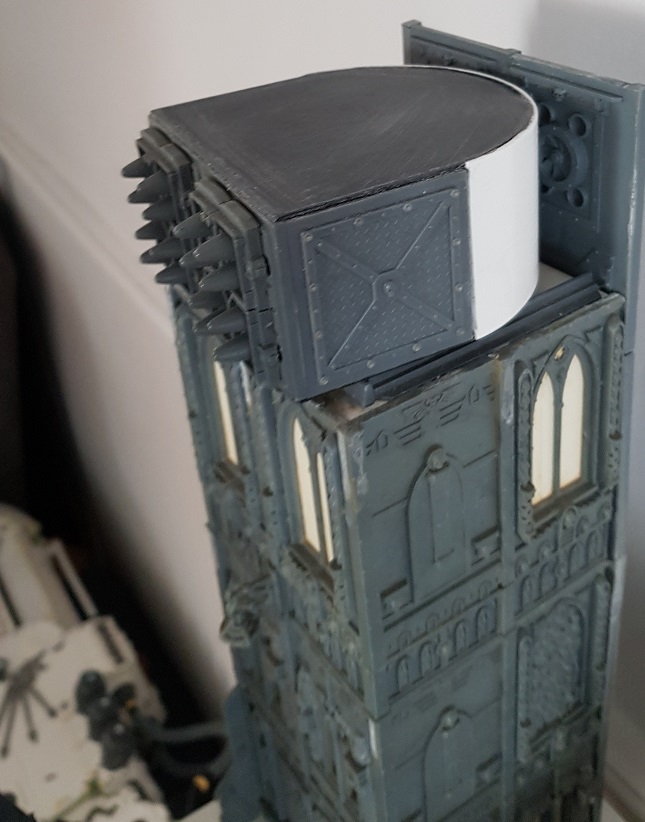
The carapace tower construction is pretty straightforward as I'm mostly using out of the box citadel building kits for the main structures. Obviously there is still a fair amount of work to do, including the forward volcano cannon structure and the sensorium dome / command and control station in the centre is still a ways off yet.
Mapping out the carapace building placement was key to me being able to progress with the body and arms as I had quite a lot of structural tweaking to do, particularly for mechanical connections and weight management through the structure of the body.
My build schedule for the project is now very tight as I am aiming to have the whole project fully completed by the Titan Owner's club walk 2022 in November where she will make her first outing in the name of the Omnissiah!
Although I only have a few months left, the big structural changes I completed over the last week were the most time intensive, so I'm on track to finish on time - wish me luck as I get my head down and plough on!
What follows now is the full build log for the more hardcore project followers - if you make it to the end of the article, you'll get a sneaky peek at the Hellstorm Cannon's 'party trick' as a reward!
Base
In order to complete the final leg assembly and attached permanently attach them to the pelvis, I needed to fix them to the base. This would mean getting the base painted as I wouldn't be able to reach any of the details once two honking great feet were attached!
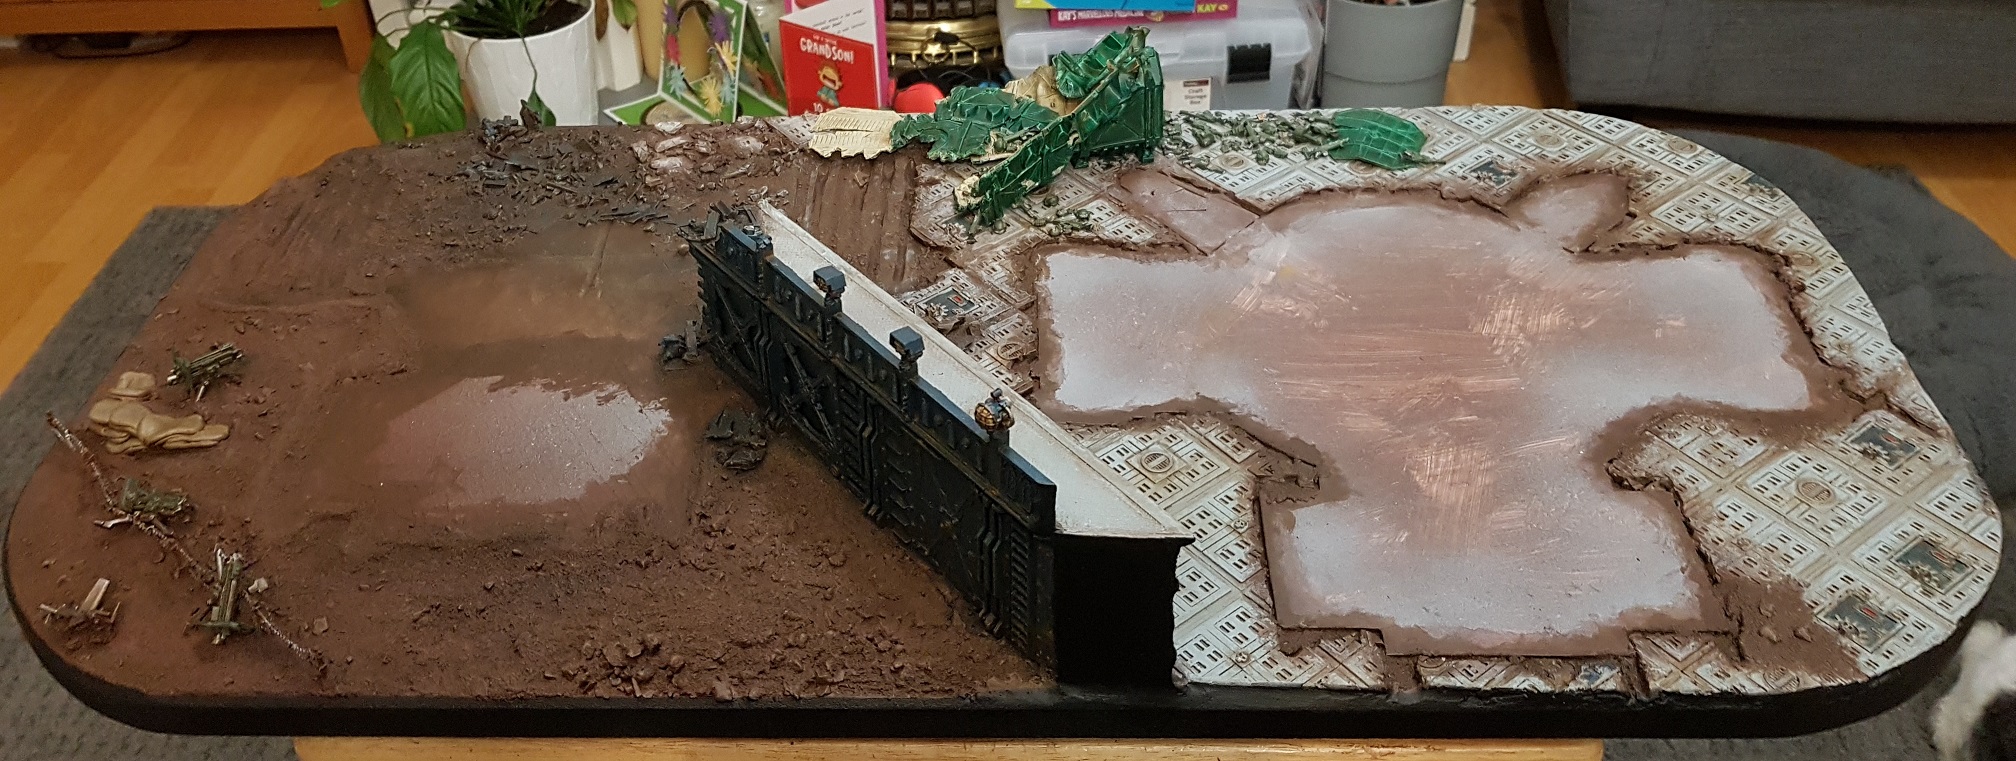
I started by sealing the whole base with a layer of burnt umber acrylic paint mixed roughly 50 / 50 with mod-podge matt to seal everything and give me a nice base layer. I did an off white spray over the city paving and wall as they would need to contrast with the muddy ground and match with my other knights / titan's bases. I then laid down all of the basic colours such as turquoise for the wall, and green on the smashed crate (not yet fixed to the base).
I also picked out the rubble where the Imperator foot has utterly flattened the wall. This is just visible when the right foot is in place. It's a small detail, but it sells the overall base and makes the titan feel like part of the story the base is telling.
I knew that I wanted to have the scattered contents of the crushed storage container on the ground early on when designing the base layout. I cleaned up a load of Cadian lasguns, helmets, grenades, flamers and grenade launchers for this purpose, adding handles and triggers to the latter after removing the unwanted hands.
I used doubled over masking tape to get them all standing upright ready for spraying.
 |
| No Cadians were harmed during the gathering of these parts |
I painted the partially crushed defensive wall to match my existing titan bases. The array of wall mounted flash lights were picked out - details like this help to give scale to the piece.
The final crushed container with its spilled contents littering the paved city floor was another good place to really show the scale of the Imperator. It's worth noting that I picked out some metal details and turquoise plate covers on the floor panels as these help tie the base together.
The container contents were deliberately painted in a camo green to match the heavy bolter emplacements at the front of the base. Two of the heavy bolters have been thrown forwards onto the barbed wire fencing by the impact of the Imperator's tread.
The raised earth around the toes is a great way of emphasising the weight of the titan - I also did this to a lesser extent on my Reaver and Warhound bases. Heavy things always displace earth as they press into the topsoil, so simulating this on the base creates the realistic illusion of mass and movement.
Realistically crushing and deforming this crate was actually a challenge as plastic doesn't bend and shear quite like metal. I used heat and patience as well as working out how it would collapse with some real world reference. I took some liberties with the contents placement, but this was mainly to add flavour and I suspect most people aren't as anal about simulating real world physics on a model as I am!
The fully painted base was sealed even though I knew I'd revisit it with grass tufts and other small details after attaching the feet and legs.
The base really comes to life with a leg in place!
 |
| A test fitting with the pelvis showed that everything would match up nicely. |
Legs & Pelvis
The legs and pelvis have taken more than half of the total build time due to their complexity and the need to stand up to the weight of the body and arms pressing down on them. I was very glad when the glue finally set and everything had worked out as intended!!
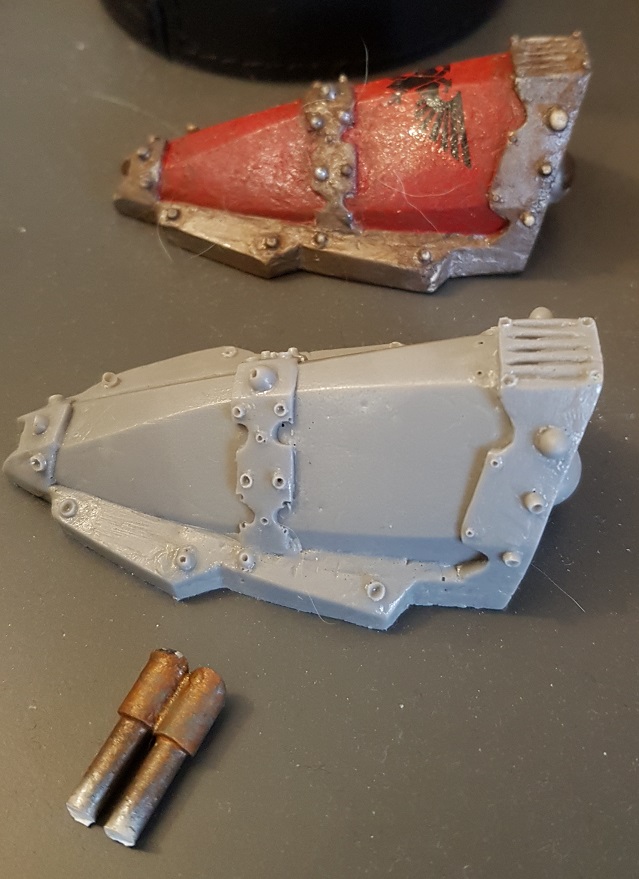
The weeping toe
First things first; I had to remove one of the rear facing support toes from the painted leg. I had an inkling that there was an issue with the resin when I first took it out of the mould, but pressed on with it. What I should have done was scrapped it straight away, but I foolishly assumed I could seal the weeping resin. It continued to bleed through the paint and ruined the finish, so I finally relented, broke off the toe and cast up another toe. Lesson learned... shortcuts will eventually bite you in the arse.
 |
| The new toe next to the disgusting weeping toe. You can see that the original is shiny - that's oozing resin muck and it's horrid :( |
 |
| New toe - note the lack of melty gloop! |
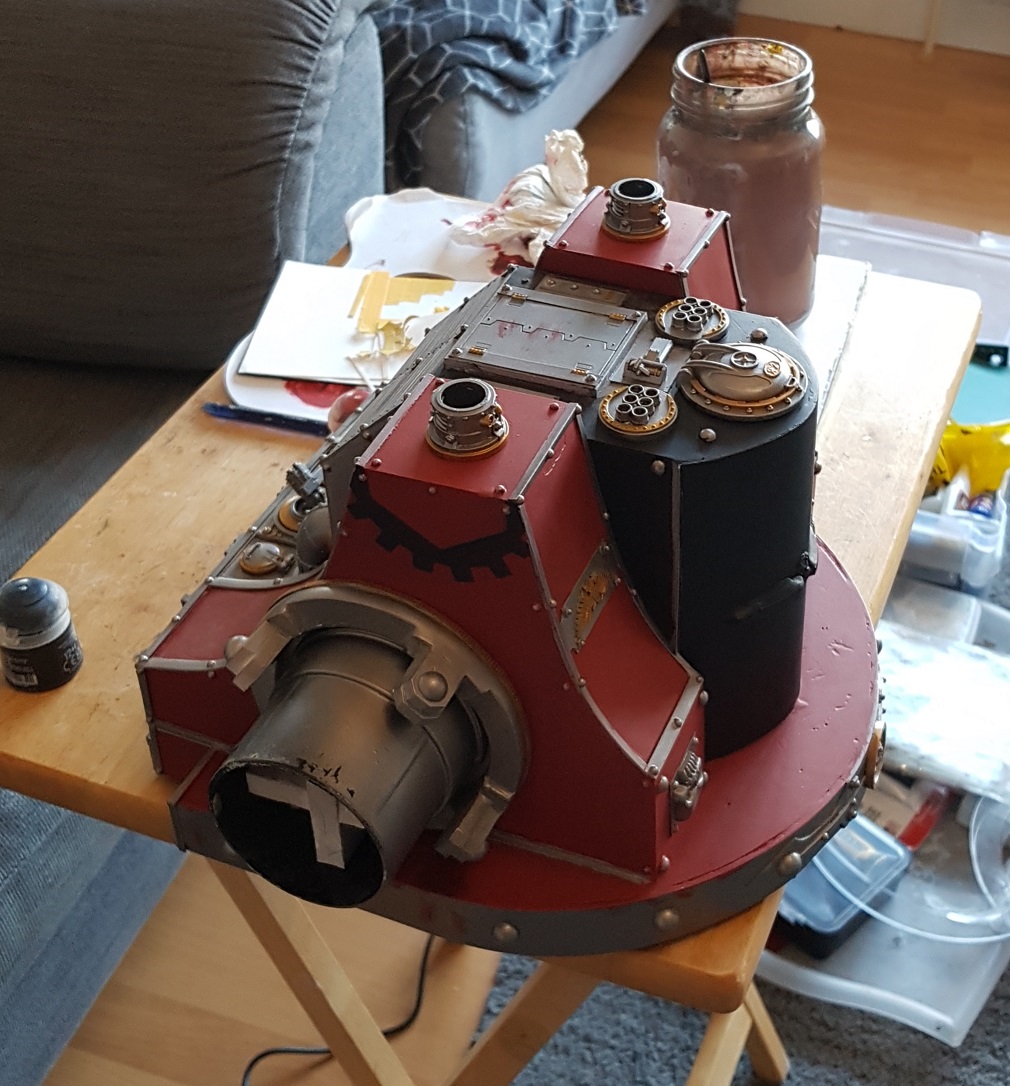
Pelvis
Painting the pelvis was pretty straightforward - especially as I had already completed the crotch plate as a test piece earlier in the build.
The main painting challenge was the sheer size of some of the large flat areas. To add some visual interest and cement Ira Metallum as a part of the Legio Metalica, I made some stencils of a stylised M and a half cog symbol.
I had already measured the areas where these would be situated, so I began by drawing a guide box on some thick paper. I drew the M using a calligraphy book for guidance (handwriting's not my strongest area - my wife says it looks like baby scribble!). I took my time and used some basic maths to work out the letter dimensions.
I used a couple of layers of masking tape to strengthen the stencil and traced the design through with a light - the easiest way to do this is tape it to a window while you trace!
I added a few small bars to join the sections of the stencil as otherwise it would fall apart after being cut out. I planned to paint over these once the stencil was removed from the surface.
Once I was happy with the design, I simply cut the whole thing out with a craft knife. I'd recommend taping down the edges while cutting it out as stencil move around if you're not careful!
I didn't take any pictures of the cog design being produced as it was pretty much just a case of using a protractor to mark out the increments. It was a lot easier to cut that out than the M!
I painted all of the base colours the same way as the leg panels, so it was all pretty straightforward.
Once the base colours were on, I taped the stencils down and carefully painted black onto the surface before removing the stencil and filling in where the bars had been.
A test with the crotch plate showed that the overall scheme worked well.
Part of my painting process for large models like this is working out what colour each of the panels will be and adding a streak of that colour to make sure I don't miss any sections - it's easy to do when you're doing so many large areas!
With the pelvis oil washed, I just had one leg left before permanent assembly!
Even though most people won't be looking at the titan taint, I still fully painted it - I was very pleased with the way that the hatches and loading winch add a little narrative.
Lots of lovely grime!
You can see the cog stencil was used on both sides of the lower pelvis. There are also some little extra symbols for people to find on closer inspection - they help break up the surface while adding some nice character!
The final leg of the race...
Due to the size of this beast, it took about the same amount of time to paint each leg as a Warhound titan and the pelvis was only marginally faster. With this in mind, you can imagine how happy (and relieved) I was to be reaching the end of the build process for the lower half!
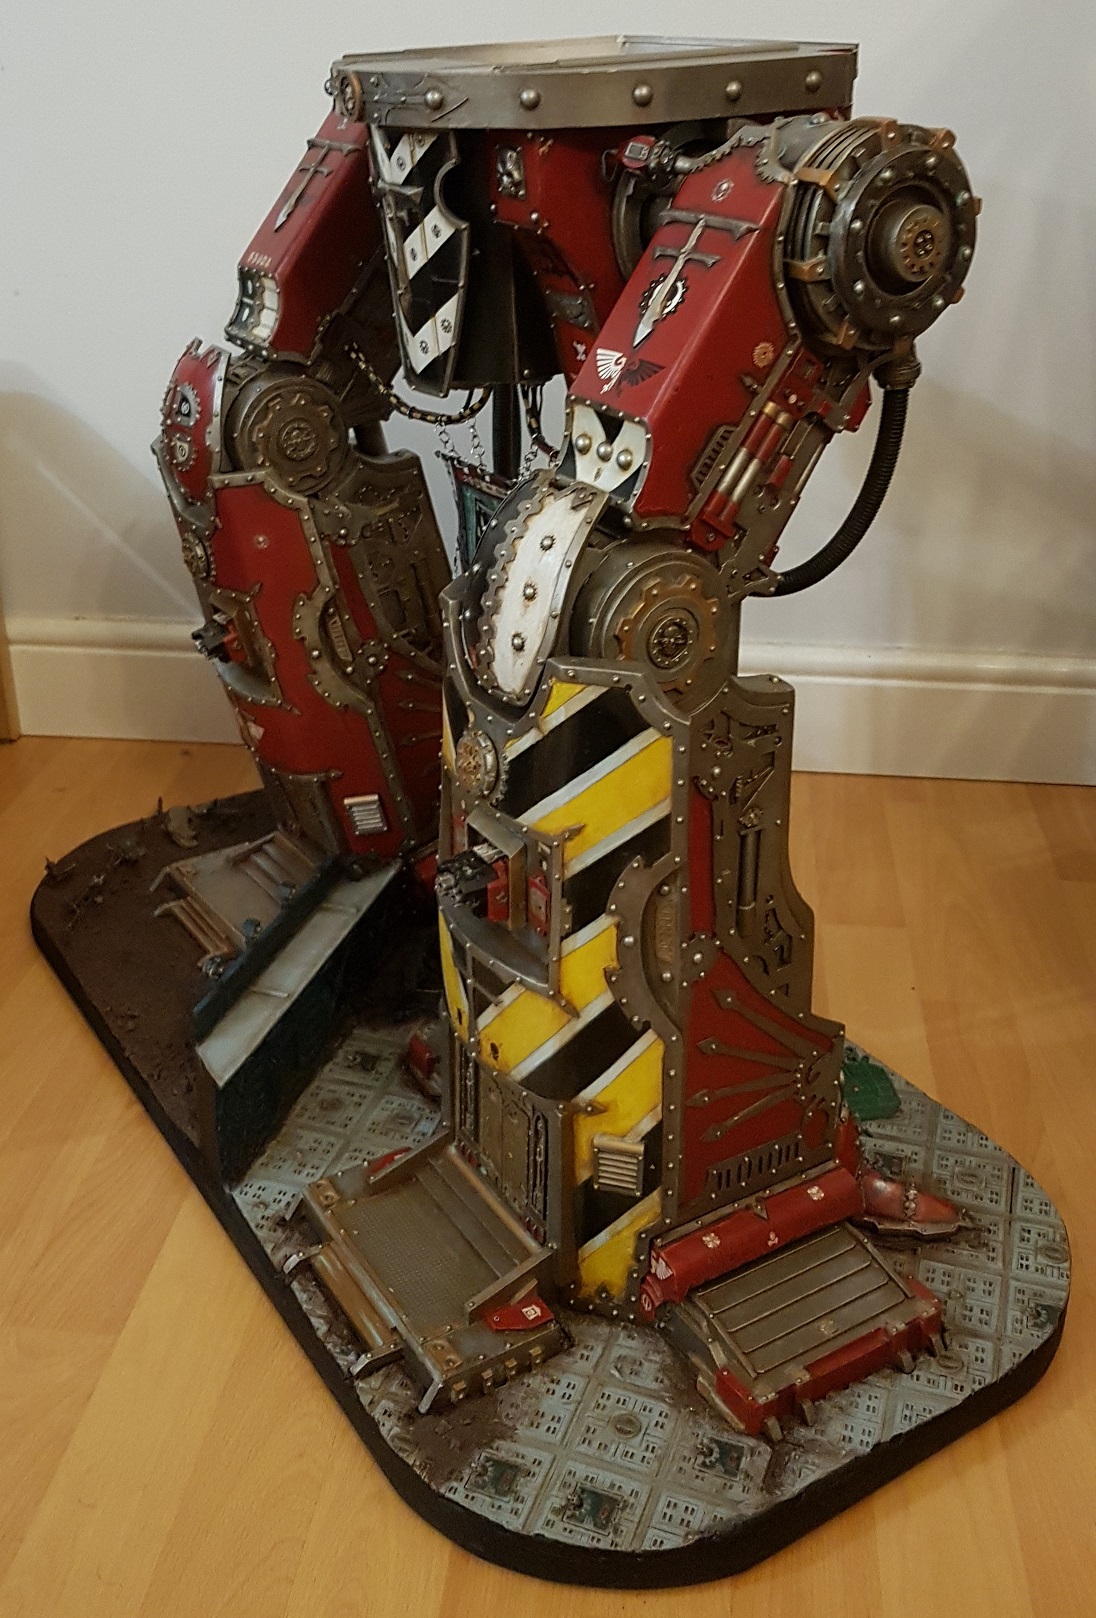
I decided early on that I wanted the second leg of the Imperator to be a spot colour to bring it in line with my Reaver, Warhounds and House Raven Knights. You guessed it... Yellow, black and white stripes! My favourite to look at when finished, but most hated scheme to actually paint!
I start by priming everything in silver as the black, yellow and white all go well over it. I mask off the stripes, paint the yellow (Averland sunset) on first, move the tape to cover the yellow and paint the black stripes (Abaddon black). Finally I mask the panels again and paint on the white (Ulthuan grey). I then highlight with Yriel yellow and Corax white. I use Ulthuan grey over Mournfang brown for chipping highlights on black areas and Mournfang brown followed by Ushabti bone for chipping on yellow. Sounds pretty straightforward, but it can be a right faff!
 |
| The rest of the foot and shin guard was painted in exactly the same way as the first leg |
 |
| A quick test fitting to check consistency before another oil wash! |
 |
| This also gave me a chance to test the pneumatic pipe lengths |
 |
| One last check with the knee and thigh armour in place |
Because the inner core of the legs couldn't be glued and screwed into place until painted, I also had to leave off a number of other parts until the painting and main assembly was complete. This included the pneumatic hoses and electrical cables.
 |
| The electrical cables were painted in an assortment of colours including yellow and black - these were black wire with masking tape applied before a yellow spray. Easy peasy! |
 |
| The hoses were painted black them washed with oils before being glued into the pelvis receivers. You can just see the thick wire I put through them poking out of the end. This acted as a pin on both ends and allowed me to shape the pipes once glued |
 |
| Each of the six electrical cables was pinned into the inner leg ports before the left leg was given an oil wash to match the right |
 |
| The cables on both legs were crimped together into bunches with metal links |
 |
| To enable an extremely strong bond, I keyed each of the shin and legs, drilled shallow holes for extra grip and pre-drilled holes to put two 6" screws up through the bottom of the foot into the leg |
 |
| I then used a LOT of JBweld epoxy glue scraped onto both areas and clamped everything overnight |
Fun fact: each Imperator leg is about the size and weight of a Reaver titan :)
 |
| I drilled glue anchor holes into the base as I'd done for the shins and also pre-drilled pilot holes for me 6" screws before JBWelding, screwing and clamping the left leg |
 |
| Yep; this thing isn't coming apart... |
 |
| The final stage was filling the hips and pelvis voids around the spokes with JBWeld (and the sole of the right foot) and use a ratchet strap to secure it as the glue cured. I then put the screws into the the bottom of the right foot through the base. |
I deliberately left the pistons until last as I knew they would need to be adjusted to fit the specific positions on the final assembly. I created one piston with a slightly longer shaft than necessary as they are easy to cut down. I made a two part silicone mould and cast up 5 extra pistons so I had 3 for each side.
After adding a small wire and painting each resized piston, I glued them onto the hip rings where they really finished off the look!
The final leg, pelvis and base assembly are now finally fixed in place and super strong!
I fitted the banner between the legs, but this may end up being relocated to one of the arms as I'm not sure I like how it obscures a lot of the leg and base detail.
Shell casings
I love to add shell casings to my titan bases and given the fact that this guy has a Vulcan Mega Bolter installed in each shin, I just had to make some for his base as a finishing touch!
I made as many VMB casings as I could stand and a few spent Hellstorm cannon shells too.
 |
| Hellstorm cannon shells lay on the ground by the right foot |
 |
| While the left foot is covered in spent VMB casings having recently fired... |
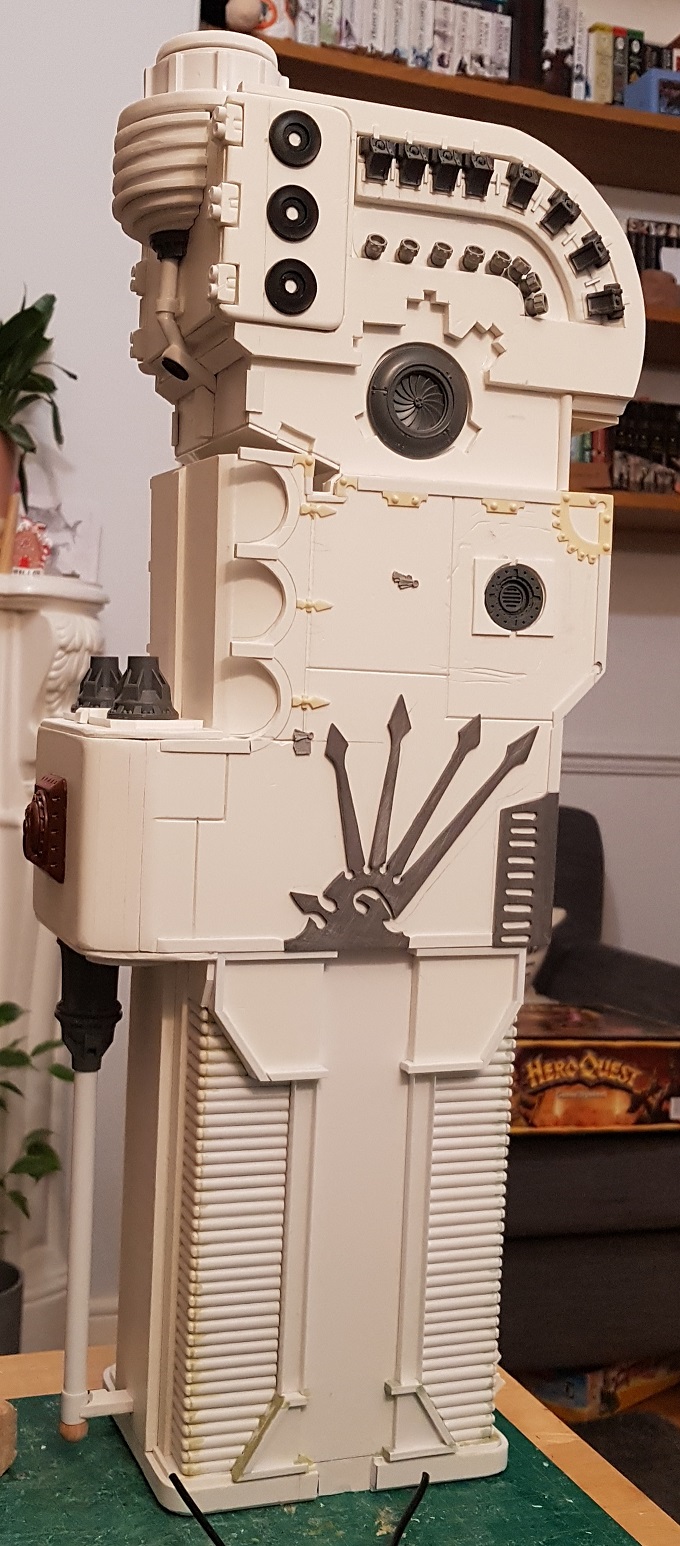
Starshatter Plasma Annihilator
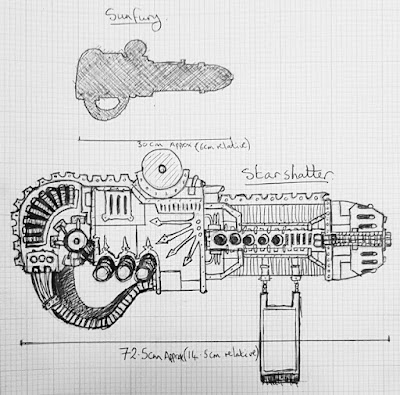
To say that this arm is big would be an enormous understatement! My initial design sketch should demonstrate that the thing is colossal when compared to the Warlord Sunfury!
I worked closely from this design and only made a few adjustments to the original drawing.
 |
| As I'd already constructed the barrel cells, I worked out the rough dimensions of the body including the depth of panels then cut out the components in layers |
 |
| I sketched out the placement of components and tested the fit with some physical parts |
 |
| Throughout the Starshatter build, I refined my design for certain key areas with drawings like this one |
 |
| Once I was happy with the general layout, I started fixing parts in place then duplicated this for the second side |
 |
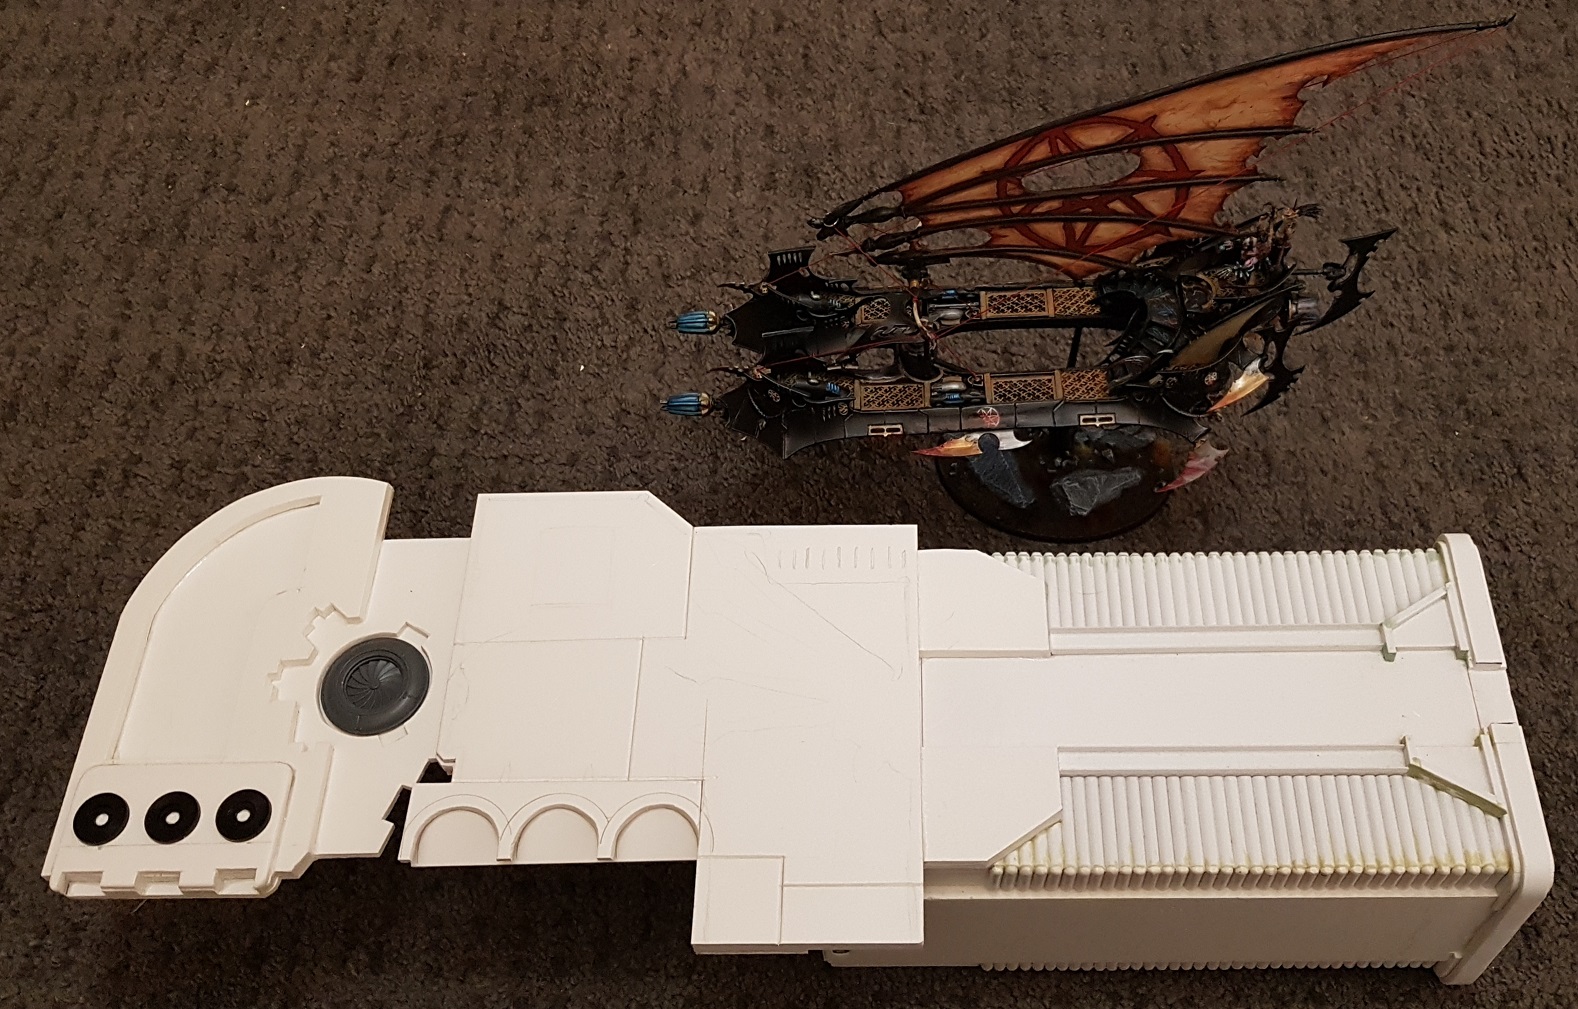
| A quick size comparison with my kit-bashed Drukhari Tantalus (pictures of that little project to follow as it's nearly complete now!) |
 |
| And another scale comparison with my cat... |
 |
| Side panel detailing was mocked out then I made all of the same components again so that I could easily repeat it on the other side |
 |
| Once all of the side details were done, I started to close up the top and bottom of the... hull? |
 |
| I was especially pleased with the slightly curved armour plating and the ribbed power supply at the back! |
 |
| Although it is much larger than the sunfury, I still maintained several of the design elements from it |
 |
| Due to the size of the Imperator, I'm integrating the Void shield generators into each major area - you can see the one installed on this arm at the top of the armour panel |
 |
| Left side |
 |
| Right side |
 |
| Top |
 |
| Bottom |
 |
| Targeting optics |
 |
| Cabling was added as per the design |
 |
| I started the nose of the cannon by shaping some Worbla over a round jig then coating it with a shell of Milliput. At this point, it looks like a sandworm from the classic Dune film! |
 |
| The arm articulation was completed with pistons over an elbow socket |
 |
| Several templates later... |
 |
| I assembled the inner core of the nose with an ovoid guide for the outer panels then cut curved guides to mount them |
 |
| Following days of fitting, sanding, filling and repeating, I eventually got everything to fit correctly |
 |
| After each quarter was completed, I fitted them to the main core and fixed everything to the rest of the arm |
 |
| The vents on the inside of each quarter are only just visible, but I couldn't leave those big flat areas blank! |
 |
| The completed arm after several weeks of hard work!! |
 |
| Pretty darn close to my original design I'd say! I did intentionally enlarge the front plating as I still wanted to call back to the bell shaped nose on the original epic scale Imperator design |
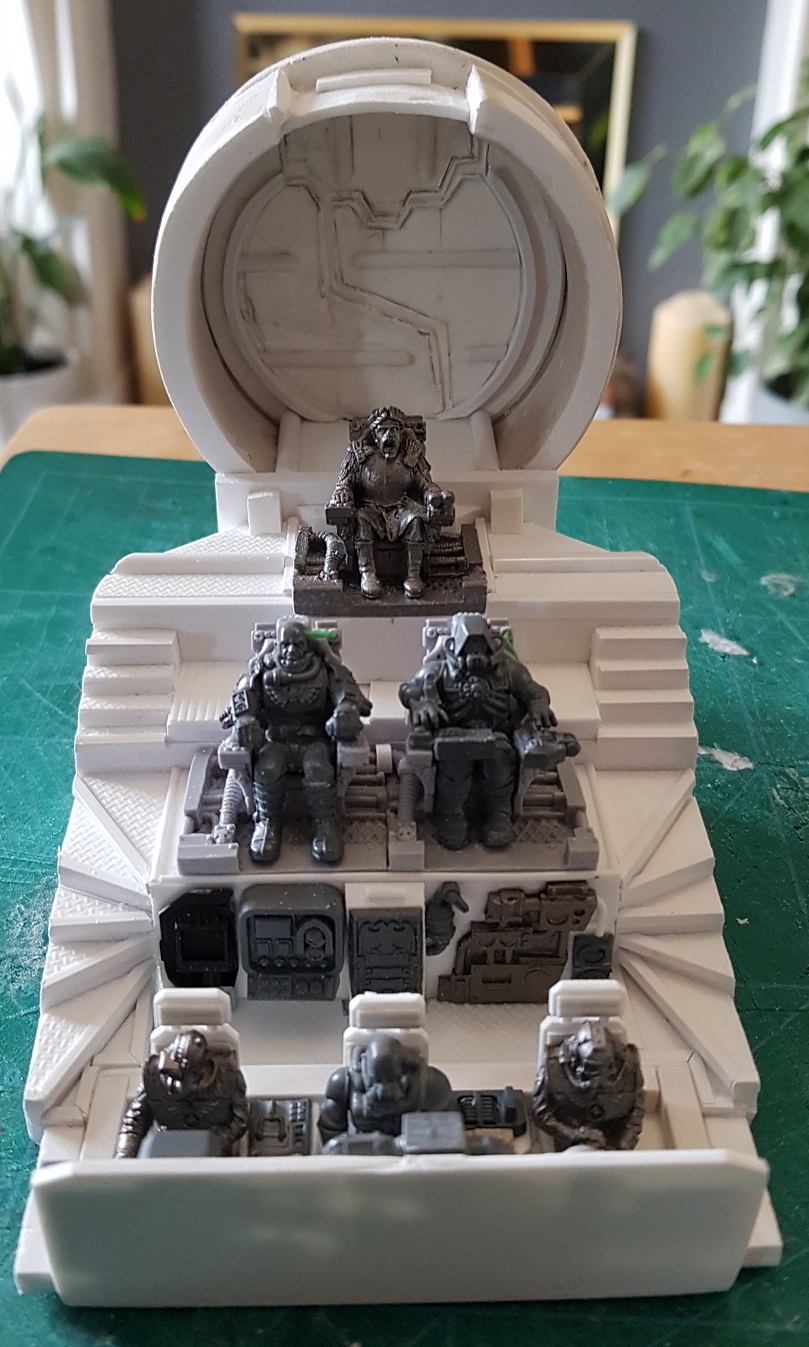
Head
The head of the titan was very unusual as it needed to be built from the inside out to house all of the crew. I did a lot of sketching and mock-ups before starting work on it, but I'd pretty much settled on a three tier deck for the moderatii and steersmen with screens and controls up high for the ceiling mounted princeps overhead.
 |
| The three Moderatii |
 |
| I built the three steersmen into a pulpit area similar to that of the Warlord with steps leading down past the 2 moderatii on the middle deck |
 |
| Another moderatii sits up on the third deck with more stairs either side |
 |
| The third deck connects to the inner hatch |
 |
| The deck layout next to the ceiling carriage rail for the princeps |
 |
| Once the main crew decks were built and the princeps rail was mocked up, I then started cutting out the outer hull shapes |
 |
| Testing and refining of the princeps positioning led me to shorten her carriage arm |
 |
| You can start to see things taking shape now |
 |
| I had to build a little stand for the neck to stop it toppling over! |
 |
| The basic structure in place |
 |
| Warlord head for size comparison |
 |
| The top view really shows the size difference! |
 |
| The rough shape of the outer head is currently very 'duckish' |
 |
| This is how the face will eventually look. Much less like a duck! |
Carapace and Body
The body needed a bit of an overhaul in that it required a lot of structural work to strengthen it, particularly around the shoulder brackets. I ended up completely removing the shoulders and cable connectors then moving them up and backwards once I'd reinforced the carapace. This was fairly laborious and I didn't take many pictures as I just needed to get this stage done!
 |
| The shoulder sockets were removed from the red area and relocated to the green box. I then added reinforced sections to the body and carapace in the amber area |
While working on the body, I also had to redesign part of the carapace and strengthen it with additional layers of foamex for rigidity as I was worried that it might start to bow under the weight of the arms. To do all of this, I also needed to map out the location of all the towers etc on the carapace, so most of the basic structures were also built and tested in place.
 |
| The new missile tower design - spires will be added above each launcher |
 |
| The carapace now sports a pair of shiny new radar dishes! |
 |
| And two turbo laser turrets |
 |
| The turbo laser turret housing was painstakingly cut from a ball-cock |
 |
| Two magnetised lascannon turrets were made for the front corners of the carapace just like the original epic miniature! |
 |
| And two AA quad autocannons operated by integrated servitors! |
 |
| Power conduits run between the radar dishes and towers |
 |
| The quake and volcano cannon towers are still under construction |
Hellstorm Cannon
Well, if you made it this far, I congratulate and thank you in equal measure! So far, I have only built the barrels and the housing to allow rotation, but I have also added a motor so the barrels will spin!
 |
| Basic barrel components ready for assembly |
 |
| I cast up a number of barrel supports in order to help keep them stable |
 |
| Getting the barrels precisely aligned was quite tricky! |
 |
| The cannon barrels assembled |


And finally, as promised - a motorised Hellstorm Cannon!
Thanks for reading!