Aliens! Predators! Versus!
 |
| One hot mamma! |
Intro
I've had a bunch of Aliens Vs Predator miniatures in my backlog for years and decided that it was time I painted some of them up!
The majority of the miniatures I have were produced by Prodos Games before they lost the license to produce the AVP: The Hunt Begins game. I managed to pick up almost all of the Alien and Predator miniatures along with a few of the Colonial Marines although I very much regret not stumping up for the Drop ship and APC when I had the chance!
As well as the Prodos miniatures, I also picked up a few bits from the Gale Force 9 Aliens board game as they have some nice miniatures in their range as well! And the point of this rambling is...? The fact that I now had two Alien Queens - one from GF9 in hard plastic and a resin queen from Prodos.
Although the GF9 one is a nice enough miniature, the Prodos Queen easily takes the crown for the most exquisite miniature Queen sculpt and has the benefit of being resin rather than hard plastic. Resin allows for better surface detail and overall form for a miniature of this size and being resin, it was also far easier to customise.
Although I had a few options for converting my second Alien Queen, it was only ever going to go one way... That's right, I decided to sculpt my resin Queen a huge egg sac!
Research!
As this mini project was going to be based on an existing character, I started by looking through production photos of the original Aliens movie and AVP. I have both of the Alien Vs Predator Studio ADI books which were really useful reference for the AVP Queen, but there weren't too many pictures of the original Alien Queen in her birthing chamber. The ones I did find were a little hazy with details like how she's suspended being pretty difficult to make out.
I opted to go for a combination of the original Queen and the more compact kidney bean shaped birthing sac from AVP. The reason for this was that in AVP she's suspended by chains; sort of plumbed into the maze facility bult by the Yautja Aliens. As I wanted this queen to be an unchained version, I needed to work out how to suspend this design.
 |
| The Studio ADI Queen sac is much more compact than its predecessor |
I referred back to the original Aliens film for the solution; you can see in the images below that the Queen has a number of very thick secondary spines which look like cow thigh bones jutting out from her back. A combination of these and bands of slime / biological resin are suspending her from the gantries and pipes.
 |
| The bony spines are very visible in this photo, but I couldn't find any rear shots to show how they connected to the queen |
 |
| The original sac was very long and was suspended in multiple places by slimy resin |
I decided early on that the Queen should be connected to the bony protrusions via a sort of bony socket a bit like a pelvis. This would take the weight of both the Queen and the sac without compromising her anatomy should she ever wish to abandon her hive as she does in the movies.
Sculpting the sac
I began by cleaning up the Alien Queen miniature, heating the components and gradually shaping them into a resting pose and straightening the tail. This was key as it would inform the shape of the egg sac itself. I shaped tinfoil and wire to achieve the rough shape I wanted then covered it with a layer of Super Sculpey and baked it to give me a nice hard basic shape to work with.
 |
| The initial shape after firing |
 |
| The secondary pelvis was located just behind the Queen's original pelvis |
 |
| As soon as the bone spines were in place, the Queen looked more 'suspended'' |
 |
| This started to give the classic profile I wanted |
 |
| There is something very unsettling about the large bone spines as they put you in mind of spider limbs |
 |
| Test fitting the Queen into her new home! |
 |
| Finally I sculpted an egg being pushed out of the ovipositor sphincter - the pin from the base would run right up through this egg to give more stability |
Painting
In homage to the Aliens movie and arcade game that I loved as a kid, I decided to go with an acid yellow colour for the Queen's egg sac.
 |
| Most of the Aliens arcade game was completely divorced from the movie, but the Alien Queen boss was fantastic! |
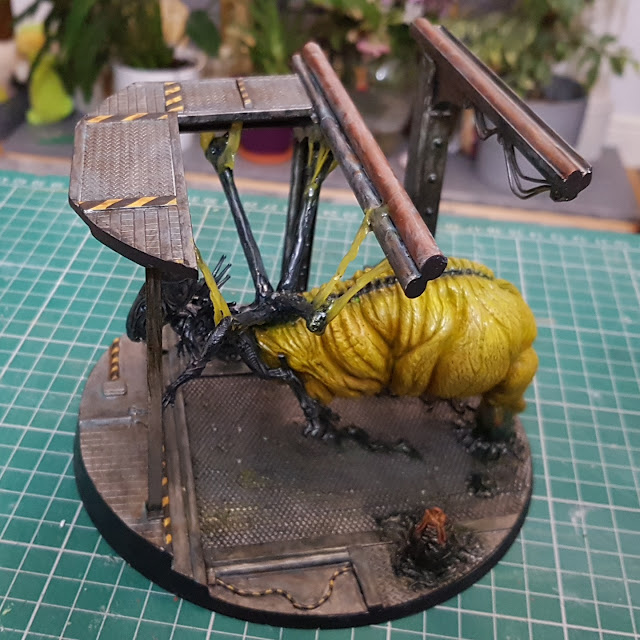
I kept the colours of the queen pretty close to the original, with glazes over silvers to give that lovely insectile carapace look. Multiple layers of varnish also helped to give the Queen that unsettling moist look from the movies.
The gantries, pipes and flooring were kept fairly plain so as not to detract from the Queen. I used hazard stripes on some of the areas such as the step edging just to break up the large metallic surfaces.
The finished Queen!
Once everything was painted, I glued the queen into place and used clear UV resin to create the drool on her mouth and the slimy resin strands connecting her to the pipework. I used some clear paints to tint the resin after fixing her in place and with that she was done!


