Back in the swing
After a lengthy posting hiatus, I'm finally back with some content! I haven't been completely idle over the last 6 months and have built up a bit of a backlog, so I'll be trying to post at least once a week for the next couple of months in order to get caught up!
My first project from the backlog is actually one I finished quite recently, taking the form of a gift for one of my two nieces who live across the pond in the faraway land of Canada. My next post will feature the gift for my second niece, but for now, I'll focus on Lizzie's gift...
 |
| It's a Book that's also a Nook. |
Book Nook
My eldest niece wanted a Book Nook which was a project I'd been wanting to tackle for a while but never had a particular reason to make one until now. As my niece loves Mermaids, the theme wasn't difficult to decide on!
Early on I decided that I wanted an oversized book which would open out into both a nook and a larger scene which incorporated lights so that it could function as a night light and decoration.
Once I'd decided on the contents, I went out and bought an A4 sized wooden jewellery box from The Works (a discount book and craft seller in the UK) and started planning out the contents and materials I'd need to make the inner details.
 |
| The basic wooden box that I started with |
 |
| A quick sketch of how I wanted the Book Nook to open out |
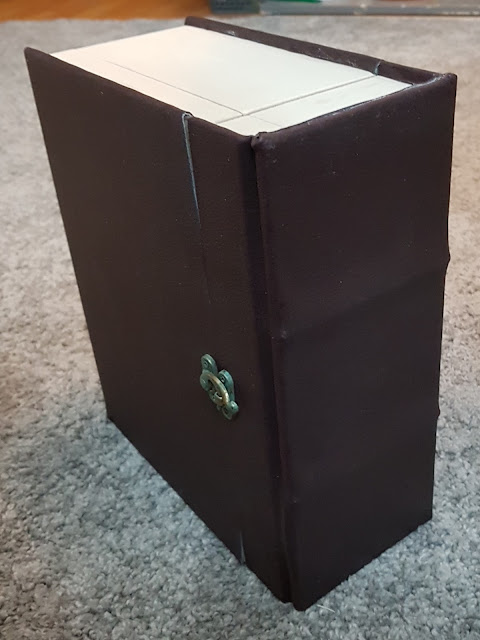
Outer Book and Structure
Even though I knew I'd need to re-use the hinges, I removed them and the original catch from the box so that I could make alterations without them getting in the way. I then carefully marked up the side of the box which I'd need to cut off in order to make the front of the Nook swing open on a new hinged joint.
 |
| As the wood was both soft and thin, I carefully made the cuts with a sharp knife and steel ruler |
 |
| The end of the box removed and glued back together to make an end 'cap'. FYI, Alan Carr was no help during this process. |
 |
| In order to make a convincing book spine, I added two sections of Foamex to the outer edge of the end cap which would form the spine |
 |
| Next, I cut thick backing board to simulate the hard back of the book and measured out a section of faux brown leatherette which was large enough to cover the outer book in one single piece and fold down over the small inner ridges |
 |
| The components measured out with a little extra leatherette for adjustment |
 |
| Once I'd added some heavy duty wood glue to the components, I carefully laid them out and added some weight in the form of books and a dice tower, leaving it all to dry overnight (I'd highly recommend the two books in this picture for anyone that has an interest in sketching - 3D Total Publishing do some fantastic books for inspiration and encouraging new drawing techniques!) |
 |
| Once everything was dry, I cut two Wooden Skewers to help mould the spine separators - these were inserted between the foamex and leatherette |
 |
| Once I was happy with the separator placement, I used superglue to Stick the leatherette into the spine indents and sides of the end cap. I used a rounded sculpting tool to press the material into the indents with the glue before it dried |
 |
| It was then back to the heavy duty wood glue and weights to stick the remaining book skin to the outer box surfaces |
 |
| I carefully painted gold onto the separating ridges to accentuate the divide |
Finally, I had to make sure that the top edge looked like book pages. I originally tried to do this by cutting an absurd number of paper slices glued together but I just wasn't happy with the irregularity of the cuts. I eventually settled on a simpler method which just involved a pen and ruler...
 |
| I drew hundreds of lines with a very thin grey fine liner to simulate pages. It took a while but gave a much nicer result than trying to use paper slivers. Once complete, I cut these out and used paper glue to stick them to the outer box surface |
Inner Structure and Details
The first step was to create an insert for me to build the inner details onto. I opted for Foamex as it was light and quick to assemble - once I'd made an inner box surface, I was able to start building the rocky cave surfaces that I intended to use for the underwater scene.
Once the first layer of mod-podge had dried, I mixed up more mod-podge with fine sand and grey paint - I gave the entire surface a nice thick coat with the exception of the smooth areas as I needed to keep them as smooth as possible (they had to be in contact when the Book Nook folded to allow friction to hold it shut when the spine cap was open and adding texture would hinder that).
Before gluing the inserts into the outer casing, I drilled holes for the lighting and cut channels into the back of the main panels for the light cabling.
 |
| I drilled holes all around the battery casing then sewed a black patch onto the back |
 |
| I screwed the casing for the LED batteries into the case so it could be easily hidden. The on/off switch is easy to see on the top while the ugly batteries are hidden behind the black cloth patch (the plate slides up and off to replace the batteries). |
 |
| I fixed a red ribbon to the spine and fed this through the book split |
 |
| Finally I carefully glued some gold lettering to the book spine and with that, the Book Nook was complete! |
Finished Book Nook
This mini project took a few weeks to complete and was actually a nice departure from my normal projects. I liked having a shell to work within as it meant I was forced to use every bit of space as effectively as possible! Working out how everything would be visible open and closed was also kind of fun - it was a really interactive build compared to a static display piece!
 |
| The outer cave wall with its ocean scene. Note the flexible fibre optic cable that I had to feed from the main cave section to carry light to this section |
 |
| The main cavern with the mermaid and treasure chest |
 |
| The Book Nook closed up - note how the rocky shelves slide in across each other to complete the scene |
 |
| The cavern all lit up! |
 |
| I think it looks beautiful lit up in the dark! |