 |
Ira Metallum - now with silver legs!
|
I've been pretty busy over the last few months, so I've not had the time to put up a proper blog post about my hobby progress. Well, I'm fixing that now with another tiresome mega post! :)
So strap in and put on your reading glasses as I exhaustively take you through around 9 weeks of drawing, painting and building!
Ira Metallum build progress
Having such a gigantic 'miniature' in the house is sometimes a bit challenging - with family life going on around it, there is a tendency for parts to get knocked and damaged. As a result, I decided to change up the build a little by completely finishing the bottom half of the titan before progressing any further with the body, arms, head etc. This will enable me to fix the hips, legs and base together. I can then move it around with less potential for damage and even store the whole thing safely in the garage.
This was not quite as straight forward as it sounded because I had a huge amount of work still to do on the shins in order to reach a stage where the legs and pelvis could be painted. I can't fully assembled everything until it's painted because there are some areas (under the armour plates and the insides of the leg skeleton) which I wouldn't be able to reach once permanently glued. Thankfully, after weeks of work, I managed to complete the leg build, the base build and start the painting process. I'll walk you through the process in the usual fashion...
Leg build
For a number of reasons I've previously moaned about described in detail, the legs are by far the single hardest part of the entire titan to design and build. Although I'm glad to have them almost complete, I am also quite proud of how they are looking. I'll whizz through the bits I had left to do - most of it was sanding, filling and adding approximately 200 individual rivets...
 |
I built for Vulcan Mega Bolter shell ejectors for the shin recesses to add some details and a little realism to the integrated weapons
|
 |
I spent night after night painstakingly adding trim to the shins, trying to keep them consistent by using a pattern which I reversed for both sides
|
 |
In addition to the regular trim, I added some of my pre-cast details such as the flue-delise and Titanicus symbols. I sanded the T flat to make it fit in with the rest of the trim
|
 |
The shell ejectors frame the Vulcans quite nicely
|
 |
Considering that the legs are still in about 6 individual parts, I was very grateful that it held together for testing
|
 |
The whole thing was really starting to come together at this point, with the silhouette becoming instantly recognisable as an Imperator with its flared shin pads and wide feet
|
 |
These areas caused me weeks of stress as I couldn't decide how I wanted them to look. In the end, I filled them to the same level as the rest of the armour and then created a trim pattern which helped me maintain consistently across both shins
|
Base
To say that the base for this miniature is large would be a big understatement! Due to the size of the space I had available, I was able to really go to town! I decided that I also wanted Ira Metallum to fit closely with my existing titan's bases so settled on continuing the defensive wall / open ground of the other bases. I also wanted to show the sheer scale of the titan by having some human scale objects such as a crushed crate and scattered objects.
 |
The first step was to mark out the foot locations on the base. I also
made sure that there was enough room for the container just at the
edge.
|
 |
I then used a dremmel to create indents to match the tread of the titan's foot as it was raising its heel, revealing the ground underneath. Having it depress the ground would help to tie it into its environment and sell the titan's size and weight.
|
 |
Here you can see how the base matches the tread...
|
 |
...and how the two things work together once placed
|
 |
I started marking out where I wanted the wall to be placed so that I could begin the floor paneling for the 'city' area. Notice that I have deliberately put this at angle cutting across the base - this serves to break up the large flat areas and makes the whole base feel a lot more dynamic
|
 |
Once I'd painstakingly worked out the panel placement, I cleaned them all up, cut them to the correct shape to appear crushed by the gigantic foot. I used a sheet of foamex to raise this foot by another 4mm compared to the other as I wanted the hips exactly level. To fix the plates in place, I glued them together in big panels, drilled holes through, glued and then nailed them in place.
|
 |
A slip while cutting the panels to meet the edge of the base resulted in a sacrifice to the blood god. PLASTIC CAN BE ANNOYINGLY SHARP!
|
 |
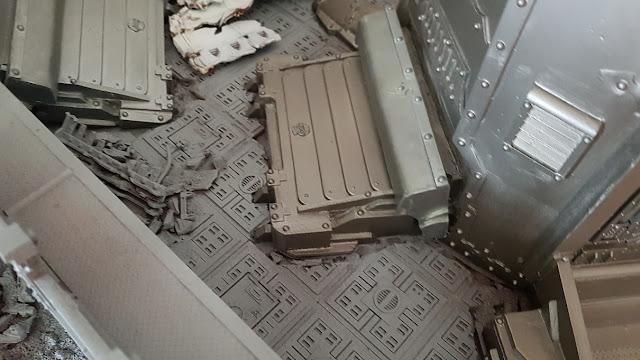
| I cleaned up hundreds of grenades, lasguns, helmets, canteens and ammo boxes to be spilling out of the armoured container. I won't lie, it was dull. I also put together some heavy bolters to make a defence line outside the city wall |
|
|
 |
The wall build was pretty straightforward. I used some old Necromunda panels for the basic structure then embelished where needed. I made a flush cap for the angled end which meets the edge of the base.
|
 |
The other end was made to look crushed by the foot of a stompy god machine. I particularly enjoyed adding struts and wiring hanging out
|
 |
The walkway on top was made from vac-formed styrene tread plate and edged with Styrene dowel.
|
I forgot to take pictures of the filling and texturing stages of the base build, but there was a lot of it! It also involved chopping up a ton of building parts which I now keep in a little jar for future projects! At one point, I ran out of sand and had to 'appropriate' some from the sandpit of my neighbour's children, but I got there in the end!
 |
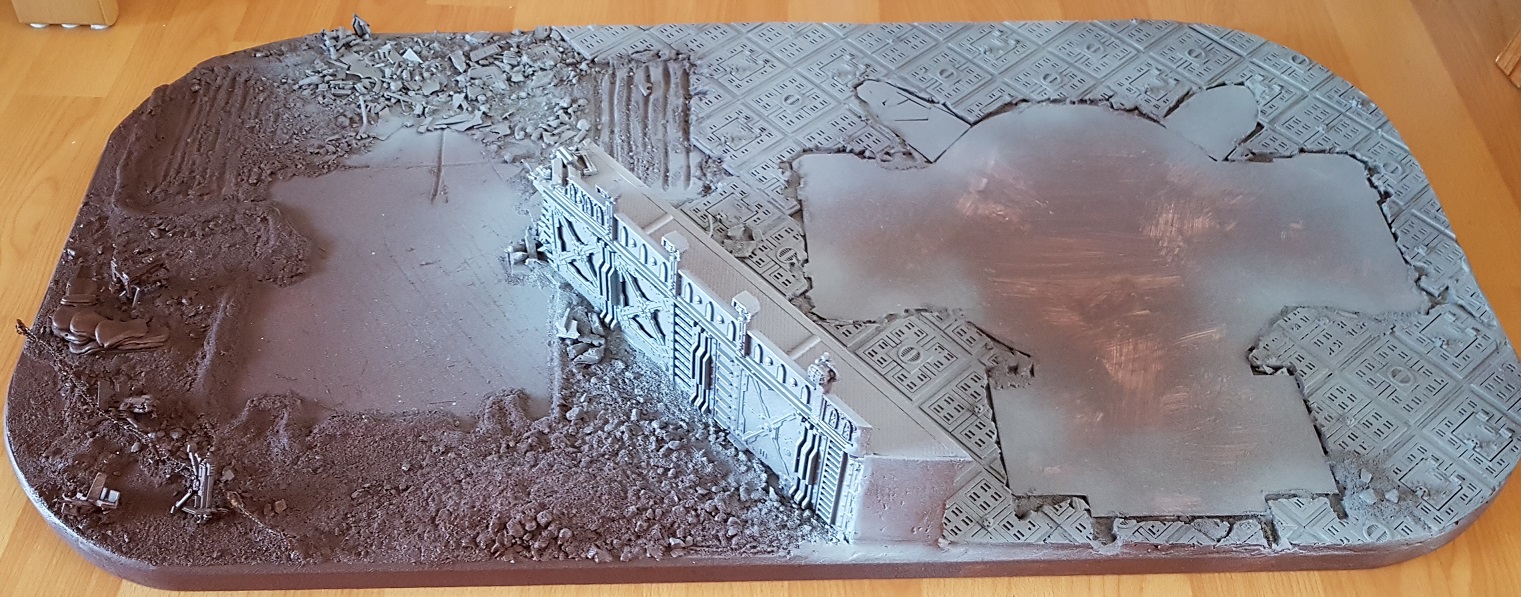
And here is the biggest base I ever made!
|
 |
From behind you can see the absolutely wrecked remains of the wall!
|
 |
I specifically added a ring of depressed earth around the lifting foot in the same way as my reaver. This adds another little dash of realism and interaction with the base.
|
 |
It's actually really hard to get good photos of this thing due to its size!
|
 |
Immediately after this stage, I went round the whole base and coated it with car body filler for strength and gap filling. I then sanded it all down for a nice smooth finish.
|
 |
To seal the whole thing and add even more durability, I mixed burnt umber acrylic paint with mod-podge matt and coated the entire base.
|
 |
I did a light grey spray dusting over the city areas as I would need to repaint them and it's easier to do this over a lighter colour
|
 |
The base coated legs and base
|
 |
The defence line has been disturbed by the tread of the titan, with heavy bolters tossed around like a child's toys! One is even hanging in the twisted barbed wire
|
 |
The feet still fit perfectly into their respective spots on the base. Once everything is painted, the feet will be glued and screwed into the base for a super strong final build.
|
Painting the legs
 |
This step is pretty self explanatory - I literally sprayed each of the leg components silver. It took two rattle cans to do the legs and pelvis...
|
 |
You can see the extended pins I added into the hips with massive steel screws and putty. This just gives the hips a bit of added strength, preventing any rotation whatsoever.
|
 |
I started painting the armour plates with some very flat colours. I'd finally decided to use oil weathering on the Imperator as the areas are just too large to weather consistently with fast drying paints like traditional acrylics. I have to give big thanks to the wonderful Lyden P (@lpminiatures - check out his beautiful engines on Instagram) for his advice on oil washes.
|
 |
After a single coat of clear gloss spray varnish, I started mocking up the decal layout that I wanted on the panels
|
 |
Once all of the decals were added, I gave everything another coat of spray gloss varnish
|
 |
And here are the plates after weathering with oils and buffing. They still need some small highlights, but I'm really pleased with the results. I highly recommend trying out oils as they give you so much more working time than acrylics for large areas
|
Banner
In my last post, I showed some rough sketches of what I wanted to put on the titan's crotch banner. I refined it down with sketches and then got to work painting this onto some thick black card
 |
This was the sketch I liked most and started with this for the initial image
|
 |
I marked out the banner and painted the skeletal warrior into the large box at the top of the banner
|
 |
Next I painted the borders and blocked areas which would hold heraldry and honours
|
 |
I also wanted a couple of thin side banners which I made by simply masking off cross hatching and painted the areas with the black and white stripes of Legio Metalica
|
 |
To ensure that I had a nice area which writing etc would stand out against, I painted parchment in the bottom box and an unfurled scroll at the top. I then painted cogs in the top corners and chains down the sides to really frame the image.
|
 |
And here is the finished banner with kill markings, heraldic symbols and honors. I also added some silver skull weights to the bottom of both thin side banners. Overall, I'm happy with the results of my first attempt at painting a detailed banner!
|
Preparing for a display
So back before Covid-19 struck, I had agreed to display my Knights of Corbenic at Warhammer World in a guest exhibition. Thanks to lockdown restrictions lifting and WHW reopening their museum area, this has now been rescheduled! My Knights and allied Mechanicus units will be going on display from the 27th of August!
As I had already created a huge display board for my knights to enter the Armies on Parade competition, I wanted to put it on display along with them. I feel like it really pulls the knights together, but it does leave the mechanicus units and pilots to be displayed separately. Although the Mechanicus units speak for themselves, I wanted a way of identifying the Knight Scions and associating them with their respective Knight suits. After a lot of pondering, I decided to make some small art cards depicting each Knight and pilot together so that you know who is who without need an explanation.
 |
| I started by sketching out each of the little vignettes with pencil,
then inking them in black. I deliberately went for really stylised
pictures with lots of scratchy shading so as to be vaguely reminiscent
of the fantastic work by legendary Warhammer artist John Blanche. |
 |
| I used alcohol markers to add colour to each of the images, keeping the palette as similar to the miniatures as possible |
 |
| Here is the final spread - I think limiting each picture to the size of
a playing card forced me to use the space creatively and only pick
elements which were instantly recognisable from the miniatures and
thereby avoiding confusing clutter. |
 |
After a little experimentation, I came up with this stand design so that each art card can be displayed with the pilot directly in front. I made a silicone mould and ran off a number of copies (I'd need one for each knight after all!)
|
 |
And here's how they look together. I hadn't painted the stand at this point, but you can see how it works!
|
 |
All together now...
|
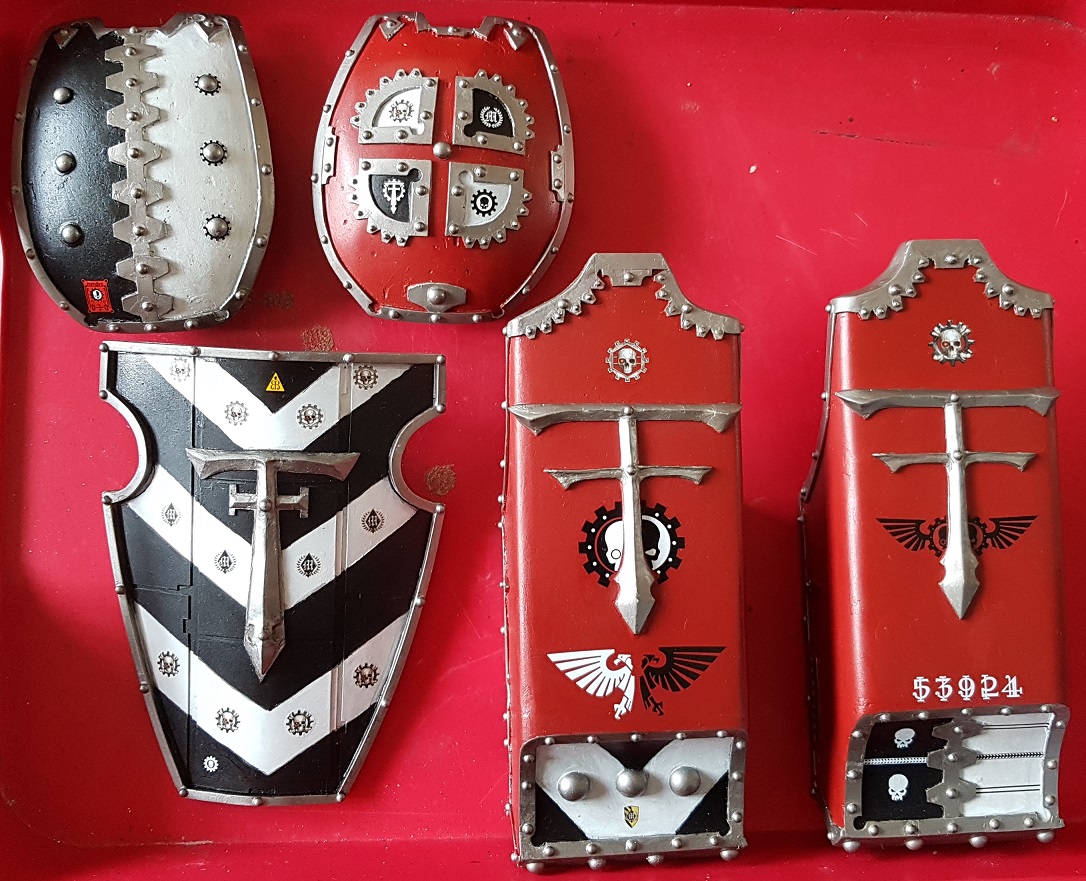
In addition to the actual miniatures, I have also been experimenting with some 40k artefacts such as devotional seals and made some specifically to go along with my knights. I started with the heraldic symbol for the Fisher King which I'd cast previously...
 |
I made two matching seals as I wanted one with a pin in the back which will be added to my titan banner at the Titan Owners club walk in August. I painted both seals with the same basic colours as the one I did previously.
|
 |
I then used oil washing to weather them - this was my test stage before using oils on the Imperator!
|
 |
I sketched out some tiny symbols and printed some paper banners incorporating them
|
 |
After weathering the paper with Alcohol pens, I glued them to the back of each seal
|
 |
I really like how these turned out, so I made some more!
|
 |
I made these Legio Metalica purity seals for my titan banner at the TOC walk in August
|
 |
I was pleased that I got this one looking really 'waxy'
|
 |
These two seals were made using some imperfect casts I had from Imperator symbol castings which went awry
|
 |
Both seals have a pin embedded into the resin so that they can be easily attached to any cloth
|
 |
I made this huge wax Fureans seal for my buddy Lyden P
|
 |
And these Astorum ones were made for another TOC member
|
The Mechanicum on Corbenic
As it's an oceanic deathworld, the inhabitants of Corbenic are always prepared for aquatic adventures, fending off giant beasts from the deep. Although the Knights do the heavy lifting, they still have a small supporting contingent which perform a lot of the mundane security and maintenance tasks.
Skitarii Aquis Squad Brink
 |
| First up is Skitarii Aquis squad Brink - specifically equipped for underwater operations, they provide support to their larger mechanical allie. Each member of the squad is heavily converted from several different kits, making them feel quite unique |
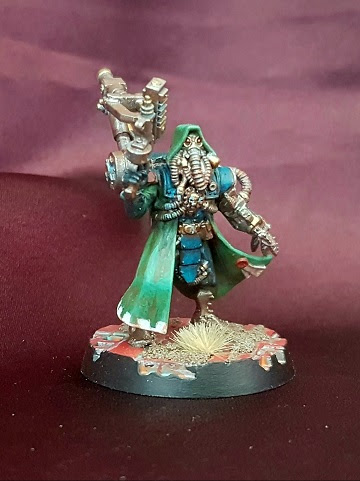
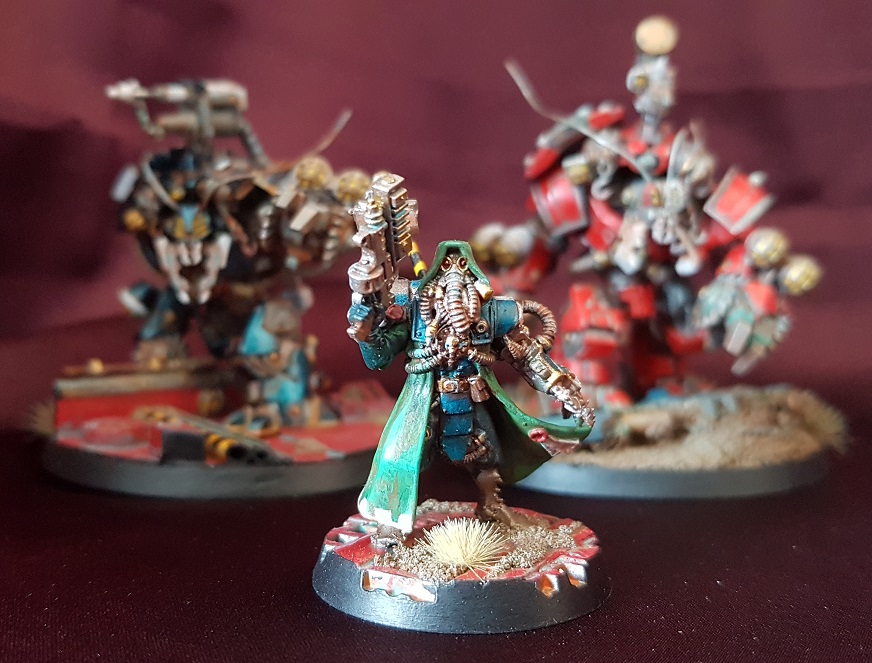
Datasmith Tetra with Castellan Robots Lobbost & Krabb
 |
I wanted my Robots and Datasmiths to not only fit in with my army theme, but be individual in a similar way to my knights
|
 |
The bases unify all of the miniatures along with certain colours which are present across each and every miniature in my Knights of Corbenic collection
|
 |
Datasmith Tetra was made from a selection of kits in the same was as the Skitarii aquis.
|
 |
His power fist is actually a Titanicus Knight arm
|
 |
The power pack comes from a Cadian vox while the servo arm was built from all kinds of spares!
|
 |
I enjoyed adding some little freehand details to the skirt of his robes
|
 |
Lobbost was painted in the colours of... a lobster. The Ambot kit was just so lovely to work on, just a genuine pleasure. I added extra lights to both ambots for exploring in the depths. They also got the carapace speargun treatment and some antennae to sell the shellfish look.
|
 |
The glossy paint effect on the armour plates took a while, but looks great against the contrasting dry looking matt rust
|
 |
Krabb meanwhile was painted in an orangey red colour similar to some spider crabs
|
 |
The red base / blue carapace of Lobbost is flipped for Krabb, with a blue base and red armour. Even though they're literally opposites, they synergise well
|
Datasmith Linerrius with Castellan Robots Hammerhead & Sinker
 |
This unit is probably the closest I got with an 'out of the box' unit in my Corbenic force. The shape of the robots reminded me of old diving bells helmets, so I retained a lot of their general aesthetics
|
 |
Datasmith Linerris has some additional mechadendrites added to his power fist arm, but is otherwise the same miniature from the Robots boxed set
|
 |
I like that the arm tentacles look to be shooting out from his arm like an enraged squid
|
 |
| I chose heavily worn brown leather for Linerris' robe as a little call back to the diving suits of old... |
 |
...and speaking of old diving suits, we have Sinker in all his glory!
|
 |
Sinker has the customary extra lights and spear gun
|
 |
Plus an arm mounted saw and a trident
|
 |
He's heavily weathered with verdigris and seaweed
|
 |
I extended the powerfist claws with the talons from the Titanicus Warlord titan kit
|
 |
And to complete the unit is Hammerhead. Again, he's had some minor conversion work on his arms and body, but the biggest change is the complete replacement of his head
|
 |
Because of the head shape, I modelled his paint scheme on the classic sci-fi character Robby the Robot from Lost in Space.
|
 |
Improve your powerfist today. Install a chainsaw.
|
Scuba Ogryn Nog of the Deep
 |
I had absolutely no reason to include an Ogryn in Scuba gear in this force. Which is exactly why I did. Nog of the Deep was a joy to make and I'm not sorry. Not one little bit!
|
 |
Scuba backpack - check.
|
 |
Reinforced air tanks - check.
|
 |
| Ridiculously large knife (with greenstuff sculpted sheath) - check. |
 |
Big trident - check. Nog is ready for a swim!
|


Once again, a joy to look at you images and read your thoughts on the process. The Big One is really starting to take shape and you can imagine him in full colour.
ReplyDeleteYour display work is really imaginative and coherent - I particularly like the Ambulls used as Castellan robots as well as the call back to Forbidden Planet!