Showing posts with label Imperial Knights. Show all posts

Tuesday 26 May 2020

Conga Blue & Imperator Build Progress

Conga Blue


In my last post, I hinted that Conga Blue was nearing completion.  Well, he's finally done and I'm really pleased with the finished result!  Conga Blue is a heavily converted Knight based on the Questoris Preceptor with Forgeworld Knight Magaera carapace and shoulder plates.

More than any other Knight in the Court of the Fisher King, Conga Blue has a very specific purpose on the oceanic world of Corbenic.  He is clearly designed for underwater mining operations, with a huge las impulsor, a giant anchor shaped pick axe, twin las cutters extending from under the carapace and a gaping grinder maw which even houses an inner rubble disintegrator.  The shoulder mounted torpedo launchers provide this already formidable engine with the power to demolish bedrock with targeted explosive force.

To provide Conga Blue with increased manoeuvrability, his main engines have been modified to power two huge propellers, allowing his streamlined carapace to cut through water like a submarine!

My intent was to create a solid looking mechanical beast that's striding through waves to reach deeper waters
The Las Impulsor was used 'out of the box' with the minor addition of some hanging mines
From this angle, you can see the propellers and rudder array which help Conga Blue move quickly through the ocean depths.  I removed the main exhausts and a large chunk of armour so that I could install them into the rear of the Knight
Once I'd finished the transparent resin water casting, I added some heavily textured paint to the water to simulate frothing water swirling around Conga Blue's legs as the water churns in his wake
Conga Blue even sports a pneumatic cutter where his crotch plate would normally be located...
As with my other Fisher King Knights, Conga Blue is heavily weathered and chipped; you can also see seaweed tangled on the Knight here and there - I think it adds to the feeling that he spends a lot of time submerged, picking up bits of detritus along the way!
It may appear simple, but this pick axe took a considerable amount of time to carve and sculpt from scratch.  I did quite a few sketches before building it as it needed to look imposing rather than comical.  I was pleased with the final heavily rusted look, along with the barnacle shells which are attached to the tip
You can't go wrong with a precision drill mounted on a mechadendrite for those hard to reach places!
Conga Blue's iconography includes two black bone tentacles on his left shoulder plate - this could represent family heraldry, or a very specific kill marking; maybe even both...
Adding tiny decals to maintenance hatches is fiddly, but I think it makes the miniature look more grounded in reality
The shoulder mounted torpedo launchers will function as a carapace weapon in game terms
Eat your heart out Pacific Rim!
Deep inside his grinding maw, you can see a rubble disintegration device at the back of Conga Blue's throat

 Imperator Progress

Just a quick update on the Imperator build this week - I've been sketching out some ideas for designs such as the legs and the Starshatter Plasma Annihilator.  I've built the main structure of the feet and am now working on the basic shin stricture.  I'm building the leg superstructure then will sculpt the main leg armour separately as this will allow me more freedom when I get the the detailing stage.

Early Starshatter Plasma Annihilator sketches - I'm trying to incorporate elements of the original Imperator Plasma Annihilator and the newer Sunfury design.  This will be one of the final elements of the build, so it's still really just at the planning stage while I work out how I want it to look
These leg sketches give an idea of how I want the legs to looks and how they will function.  It's important that I can actually pose them rather than build them in a really static pose, so I'm planning to build the core components then add the mechanical elements such as pistons once I'm happy with the final assemby
This was my first mock-up of the feet - as they're supporting the rest of the miniature, the bottom layer is 10mm MDF, which will prevent it from becoming too top-heavy and unbalanced.  The feet will be screwed into a base for the final assembly for extra support
Multiple layers of foamex were screwed and glued onto the MDF foot plates.  Next, I will be constructing the rest of the shin structure then it will be on to the thighs, pelvis and hip joints while I wait for some heavy duty filler to be delivered!
I'll post updates on the Imperator as frequently as I can, but expect them to come only when I've reached a significant milestone.  I'm always happy to hear from you guys - let me know what you think of the build so far in the comments :)

Tuesday 19 May 2020

House Raven Knight Preceptor Rygan

Preceptor Rygan


In my last House Raven progress post, I showed a WIP image of the House Raven Preceptor I had next on my painting table.  Well, now he's finished, so I thought I'd show him off and give an update on my TOC Walk progress!

Armed to the teeth and sporting a mean looking face plate, I think he looks like a gladiator! 
When I constructed Rygan, I wanted to show that his Las weaponry required a lot of reactor power, so added numerous cables - they look great but were fiddly to paint!
I re-used the buzz-saw arm which I removed from the Kodiak when he got his upgrade.  It's actually a real rotary tool saw blade - I think it works perfectly!
I used a spare Atrapos Lascutter to make the Las Impulsor for Rygan. I think it works really well despite being a little larger than a standard Questoris class weapon
The right-hand side of Rygan's carapace, shoulder pad and weapon shield have the trademark House Raven chevrons which I managed to line up across the top plates
Getting the chevrons straight on the gun shield was... challenging.

 Here's how my force readiness currently stands:

Venator Light Titan Maniple:
Reaver Titan - 100% complete
Warhound Titan - 100% complete

Acastus Knight banner:
Asterius - 100% complete
Porphyrion - 100% complete

Cerastus Knight Banner:
Lancer - 100% complete
Lancer - 0% complete (Optional)
Acheron - 0% complete (Optional)

Questoris Knight Banner:
Knight Errant - 100% complete
Knight Preceptor - 100% complete
Knight Paladin - 50% complete
Knight Gallant - 50% complete
Knight Crusader - 50% complete
Knight Warden - 50% complete

In other news...

Although I still have 6 knights left on this list, I am taking a short break from House Raven to work on the outstanding elements from The Court of The Fisher King as I need to make sure that they're completed within a similar time-frame.  I'll also be putting aside some more time to work on my Imperator Titan build, but progress on that mammoth build will be coming to another post in the near future!
Conga Blue has now been weathered and is ready for his panels to be painted.  Once his body is complete, I'll be setting him permanently into his resin base.  Stay tuned for another update soon!

Tuesday 14 April 2020

Excidium Rex Walks and House Raven Rolls out!

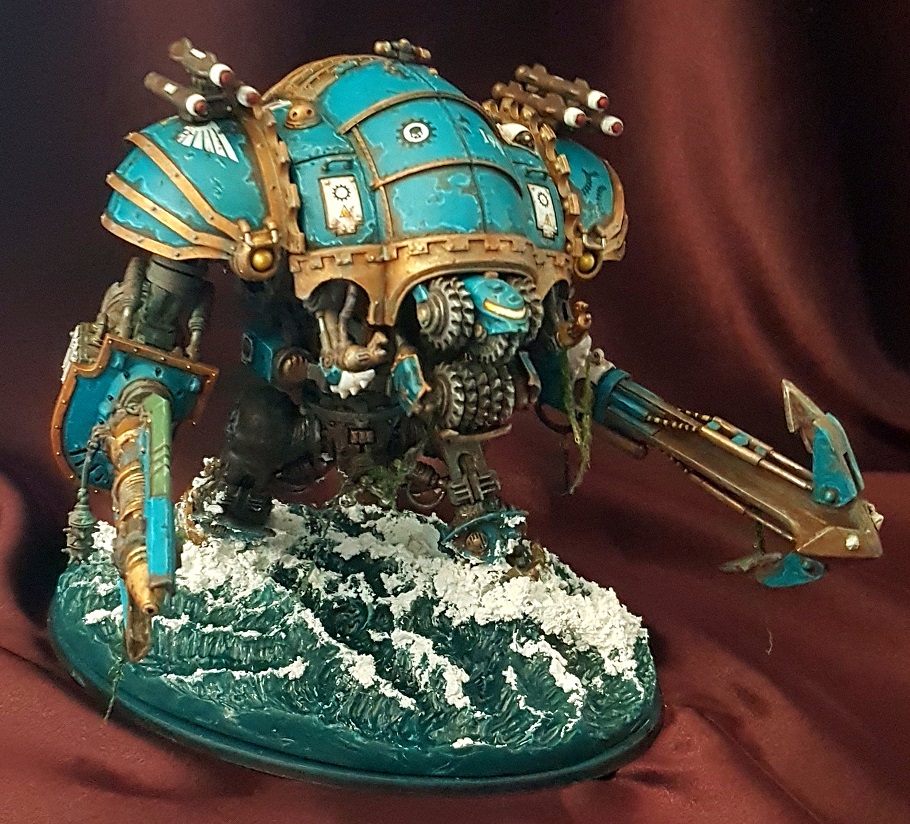
Warhound Titan Excidium Rex


I started working on this Warhound over a year ago and managed to get him 'table ready' for the 2019 UK TOC Walk, but felt a little ashamed that I had to rock up with an unfinished model in play.  Well, I have now eliminated that shame waith a hail of bullets and plasma, for Excidium Rex is finally complete!
Bracing itself with one enormous foot on a defence wall, Excidium Rex scans the battlefield for prey...

To set him apart from his pack-mate Fulgur Manus, I stripped his carapace of detail then sectioned off an area on each side where I could add some nice unique designs like this chequerboard pattern with kill markings
On this side a large Aquila and the unique registration number of this engine
The main carapace proudly displays the old-school Legio Metalica emblem as well as a House Raven crest honouring the Legio's closest ally 
As with my other two titans, I applied a large amount of weathering to the armour plating.  As I hand paint everything, this took some time!
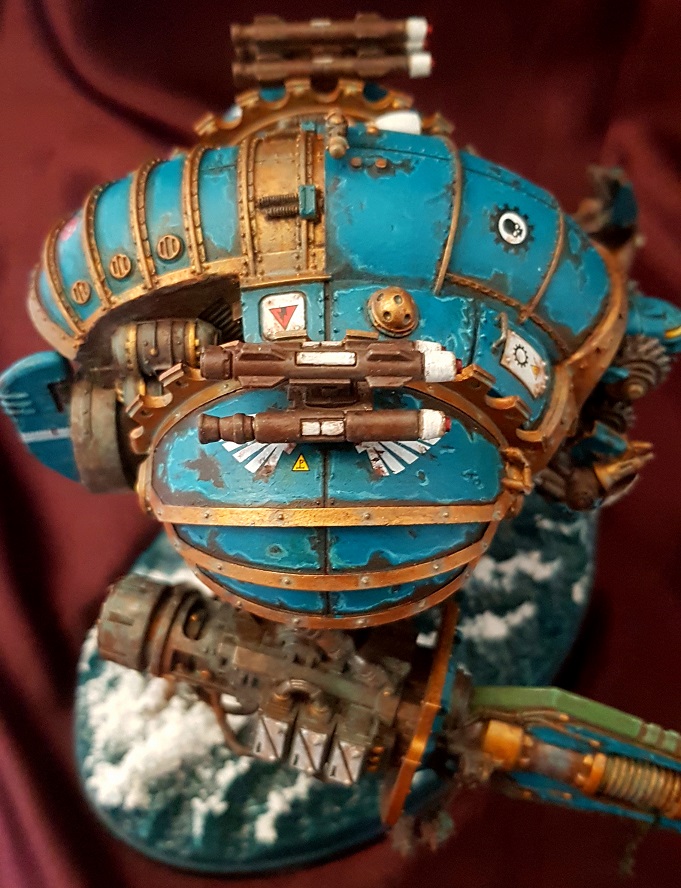
A close up of the Vulcan Mega Bolter where you can see the symbols I applied on the top edge to add some variation
I was very pleased with the heat staining on the barrel of the Plasma Blastgun
I added some white and red symbols to this large black plate to make it stand out against the extremely bright glowing green plasma cells
I like that he looks quite menacing, peering over the wall!
I added some stripes to the crotch plate, but kept the familiar colour scheme.  The black cogs running down the centre stripe give just enough detail without overwhelming it
I deliberately reversed the shin pad colours on Excidium Rex so that he and Fulgur Manus are like the Yin and Yang of Warhounds - unique, but still clearly linked
I used some of the new Legio Metalica symbols which were recently released for Adeptus Titanicus on Excidium Rex's head.  Although they're for smaller scale models, I think they work well on his smaller plates!
Again, a new symbol can be seen on this side of his face plating
One of my favourite features of this titan are the Vulcan Mega Bolter shell casings scattered all over the floor at his feet.  Each shell was hand made with styrene sheet and tubing. I actually measured the barrel and ejection port to make sure they were perfectly in scale!
A lot of people don't base their titans, but I do as I like to add to the story of the finished piece - the heavy bases also mean that they're impossible  to knock over!
And here is the completed Warhound pack in all it's titanic glory!
The only problem with such huge bases is the fact that you need an enormous box for transportation and storage!
As a treat for a good little puppy, I added one of the new transfers to Fulgur Manus' head plate as well
Metalica and Raven Walk as one

House Raven Dice Tower - Ready to Roll!

Most gamers know the sinking feeling which accompanies the sight of a handful of dice disappearing over the edge of a table.  I've used many different dice trays in the past, but have always wanted a proper dice tower.

Well, thanks to the additional spare time I've had over Easter (and being stuck in the house because of lockdown), I finally got round to making one of my very own!

I modelled it on the Keep Inviolate symbol from my Knight Raven Household - Unfortunately I didn't document the build process, but I'll give you a brief summary.

I sketched out the design and made some rough measurements for the parts I'd need.  I marked these out on some 4mm thick Foamex board then cut out the components with a knife and steel ruler.

Foamex is really easy to cut at an angle and can also be sanded to make sure that all of the joins fit flush. It may look like a straightforward shape, but this tower tapers and has a lot of awkward angles. I cut the angles by eye after a bit of test fitting.  Foamex is quite forgiving and is easily filled, so mistakes are not as much of an issue as with some other materials such as styrene.

The other main reason I have started using foamex is that it can be quickly assembled with superglue. Most lightweight materials such as extruded foam melt, but foamex actually soaks up the glue and dries almost immediately without melting or deforming!

No more scrabbling on the floor for me!
I added transparent windows to the front in order to mimic the Keep Inviolate's iconic design
The studs around the tower were plastic half pearl craft stickers which were glued in place
The rear of the tower - the 'detail' on the back was made with offcuts and actually caps off the styrene tubing which runs through the tower
I kept the tower sides fairly simple, but added House Raven iconography to the tray walls
The styrene bars, walls and slopes inside the tower were painted to look like weathered steel
I stencilled the House Raven lightning symbol into the tray bottom. The concrete texture was added by pressing a ball of aluminium foil into the Foamex
ROLL OUT!

On the horizon...

In a previous post, I showed my TOC Walk progress list - here's how it looks now...

Venator Light Titan Maniple:
Reaver Titan - 100% complete
Warhound Titan - 100% complete

Acastus Knight banner:
Asterius - 100% complete
Porphyrion - 100% complete

Cerastus Knight Banner:
Lancer - 100% complete
Lancer - 0% complete (Optional)
Acheron - 0% complete (Optional)

Questoris Knight Banner:
Knight Errant - 100% complete
Knight Preceptor - 75% complete
Knight Paladin - 50% complete
Knight Gallant - 50% complete
Knight Crusader - 50% complete
Knight Warden - 50% complete

WIP House Raven Knight Preceptor