Sandy and full of death
 |
| Behold the Ash Waste Arena in all of its sun-beaten glory! |
Desert Arena
Some time ago, I had the idea of creating an arena for Ash Waste warbands to wager on and occasionally toss captured fighters into. This project was on and off my table for a couple of years and is finally finished - I'm hoping to use it in an Ash Wastes game soon!
I wanted the arena to be really gnarly and 'Necromundary' so I based it on an enormous beast skeleton, with the wretched dregs of the Ash Wastes having made the most out of the scavenged bones.
The patchwork canvas / leather roof is removable so that the inside of the structure is still accessible.
Although there are some stone foundations, the bones make up the majority of the Arena's structure with barbed wire fencing strung haphazardly between them. Two entry hatches at the far end are intended for introducing participants to the Arena or providing entry for enforcers to intervene.
Meanwhile, a large cared is situated at the other end, containing some rather angry, sun-burned creatures ready to charge into the arena and attack their position as soon as their captors release the door locks on their cell!
And speaking of overseers, there is a handy control platform above the cages, with a control panel to release the beasts, a heavy stubber mount to 'restore order' and some slate boards for noting odds and recording wagers!
 |
| The Arena is littered with the skulls of former combatants |
 |
| I wanted the tent top to provide a small amount of cover from the elements - I like that it has the feel of a circus ring |
 |
| Onlookers can peer through the bones and fencing but probably shouldn't get too close... |
 |
| The Arena should attract the best slavers, beast trainers and gamblers in the wastes! |
 |
| An Ash Waste Nomad watches the fight from a safe distance... |
 |
| The arena isn't gang specific even though I've photographed it with Nomads, it will work with any faction |
 |
| Carnage in the arena! |
 |
| The doors to the Arena cages below the betting odds boards |
 |
| The doors open and close for that little extra dramatic touch! |
 |
| Skulls of the fallen littler the ground outside |
 |
| A shabby control platform allows the overseer to keep watch on the fights from above |
 |
| In true Necromunda fashion, the structure is made from rusty cobbled together parts! |
 |
| Will you choose to enter via the red hatch... |
 |
| ...or the blue hatch? |
 |
| Release the Ur-Ghuls! |
 |
| Fly my pretties! |
 |
| The roof's tent wires are connected with magnets and via the central pole so it can be easily removed during games. |
 |
| The main tent top pegs into the central mast |
 |
| The sands of the Arena are splashed with the blood of the fallen |
 |
| Starved Ur-Ghuls charge from the cages to fight a brutish Clawed Fiend |
 |
| The cage is deliberately based on cobbled stone to prevent the captive beasts from tunnelling out! |
Arena Beasts
Although the Arena is a great terrain centrepiece to base scenarios around, where would it be without some (un)willing participants? Bring on the beasts!
 |
| I reclaimed and repainted some older models for use with the Arena |
 |
| I'm not sure I'd want to face any of these creatures! |
Clawed Fiend
I've had this miniature for a long time now - he's metal and paint chips off way too easily, but I still love my classic Clawed Fiend!
Ambull
This was the Ambull I sculpted way before GW redesigned the creature so it's closer to the original metal mini than the awesome plastic version which was released for Blackstone Fortress. I freshened up his paint and rebased the model so that he fit in with my Ash Waste desert scheme.
Ur-Ghuls
I love the Ur-Ghuls which were released in plastic for Blackstone Fortress. They're just vicious, blind and happy to shred anything in front of them - perfect for the Arena! I painted these Ur-Ghuls to have horribly sun-burned skin as they're being kept out in the sun of the Arena day after day! Their natural skin colour should be a muted pink, but the burns cover most of the skin on their heads, back and arms
As with many of my little projects, I tried to keep a visual log of my progress - these pictures are shown below with a little commentary on how I made this terrain piece!
The Skull
The skull was originally sculpted for a different project which fell by the wayside. I decided to re-use it for the Arena as I was really pleased with how the sculpt turned out and didn't want to waste the effort I'd put into it (around 20 hours of sculpting)!
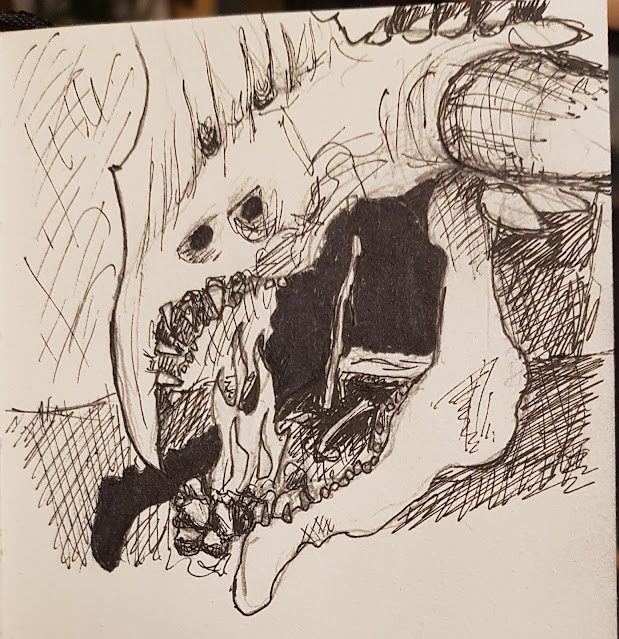
I used the beast pictured below from an Age of Sigmar art piece by Games Workshop as a starting point.
I did a number of sketches of the skull to try and work out how the head would look without all of the soft tissues
As with most of my one-off sculptures, I decided to use Super Sculpey as it's quick and easy to work with over a tinfoil core.
 |
| I made the skull in multiple parts, beginning with the main skull (not the test teeth I had on hand to help get the tooth cavities right) |
 |
| I removed the epoxy teeth before baking, being careful not to deform the cavities. Epoxy putty is better for teeth as it's more durable than fired Sculpey |
 |
| While mapping out the skull details, I also made the basic horn and jawbone shapes that I'd need later |
 |
| The skull with the basic horn shapes fitted and one half of the jaw in place. I made the jaw in two parts as it was easier to test the fit and reach details with two halves |
 |
| The finished skull with the epoxy teeth glued in place |
 |
| Achieving symmetry on a skull this detailed was not an easy task! |
 |
| The two jawbone parts were joined at the chin but not fixed to the skull |
 |
| I was very pleased with the etched detail on the horns and especially on the nose crest. I took inspiration from the Pacific Rim Kaiju for the nose horn |
 |
| This is definitely the most dynamic skull I've ever sculpted! |
 |
| Note the little stand at the back of the skull - this was just a blob of Sculpey which I fired to stop the skull putting weight on the delicate jaw assembly |
 |
| While sculpting it, I made sure that the jaws opened and closed smoothly from the hinge joint |
 |
| The jaw could be separated - it reminded me of a cactus on its own! |
 |
| I was particularly pleased with how the two rows of teeth formed naturally into the beak - it's a very odd creature! |
The Arena grounds
My initial sketch was very rough and ready, but it was enough for me to feel confident that it would work
As I already had the giant skull, the first thing I did was build the cage as I knew it would be easier to integrate it into the arena if it was available while I sized up the parts for the base
 |
| Building the cage was pretty much a case of working out the dimensions using some spare cities of death tiles as a roof, then cutting all of the poles and spokes from Styrene. Assembly was a massive pain in the butt which is why there aren't any pictures of the actual build. Keeping it all level and not accidentally nudging parts out of line was the main issue. |
 |
| The doors on the front of the cage were made from styrene sheet and some feet from the 40k pipe terrain set. I built the tiny working hinges from styrene and paperclips (the steel from paperclips is great for this as it doesn't bend easily) |
 |
| I had to keep checking that models would fit inside the cage while I was building it |
 |
| I ran paperclips through the main support bars leaving enough at the top and bottom to pin the parts together |
 |
| Perfect fit! |
 |
| The little door stoppers and the runner at the bottom keep the doors in place when they're closed up |
 |
| Each of the vertical bars would be pinned to the Arena board on final assembly |
 |
| Once the stubber and ladder were added, I paused work and started mapping out the rest of the Arena |
 |
| Once I'd cut the base plate and worked out where everything would be situated, I cut thick aluminium for the core of each rib. I created the arena walls with a ton of hand cut stone blocks, then built up the outside dunes with Sculptamould |
 |
| At this point, the ribs and skull were still removable |
 |
| I sculpted the basic shape of each rib with Super Sculpey |
 |
| It's worth noting that I also keyed the surface of the arena basin for better adhesion in advance of texturing it |
 |
| The basic rib shapes before being fired |
 |
| After firing the ribs, I carved and sanded them into shape then glued them all into place |
 |
| Next came the labour intensive process of adding barbed wire fencing between all of the bones! This stage did take quite a long time... |
 |
| While texturing the base, I used various scatter components to add to the story of the Arena, such as the piles of skulls and the little generator hooked up to the fencing, implying that it's electrified |
 |
| I used a much finer grade of sand on the Arena floor as it would be relatively well maintained compared to the sandy banks outside |
 |
| I had to gradually build up the sand and gravel around the base of the skull to make sure that the details weren't obscured but it was still supported rather than hovering above the sand bank |
 |
| I etched cobbled stone around the platform and made sure not to cover it with texture |
 |
| Once all of the texture had been added, I created the canvas / leather roof by tearing up some heavy gauge paper, soaking it in watered down mod-podge and carefully layering it over the suspended roof wires |
 |
| Note that I added the master mangler squig skull to the outside the arena. I originally sculpted and cast this for the base of my Troggoth King project |
 |
| The painting process was pretty straightforward - everything was either sandy, bony or rusty! |
Well, that's all from me for now, but stay tuned for some more Necromunda posts very soon!