Sound the Warhorns!! |
| |
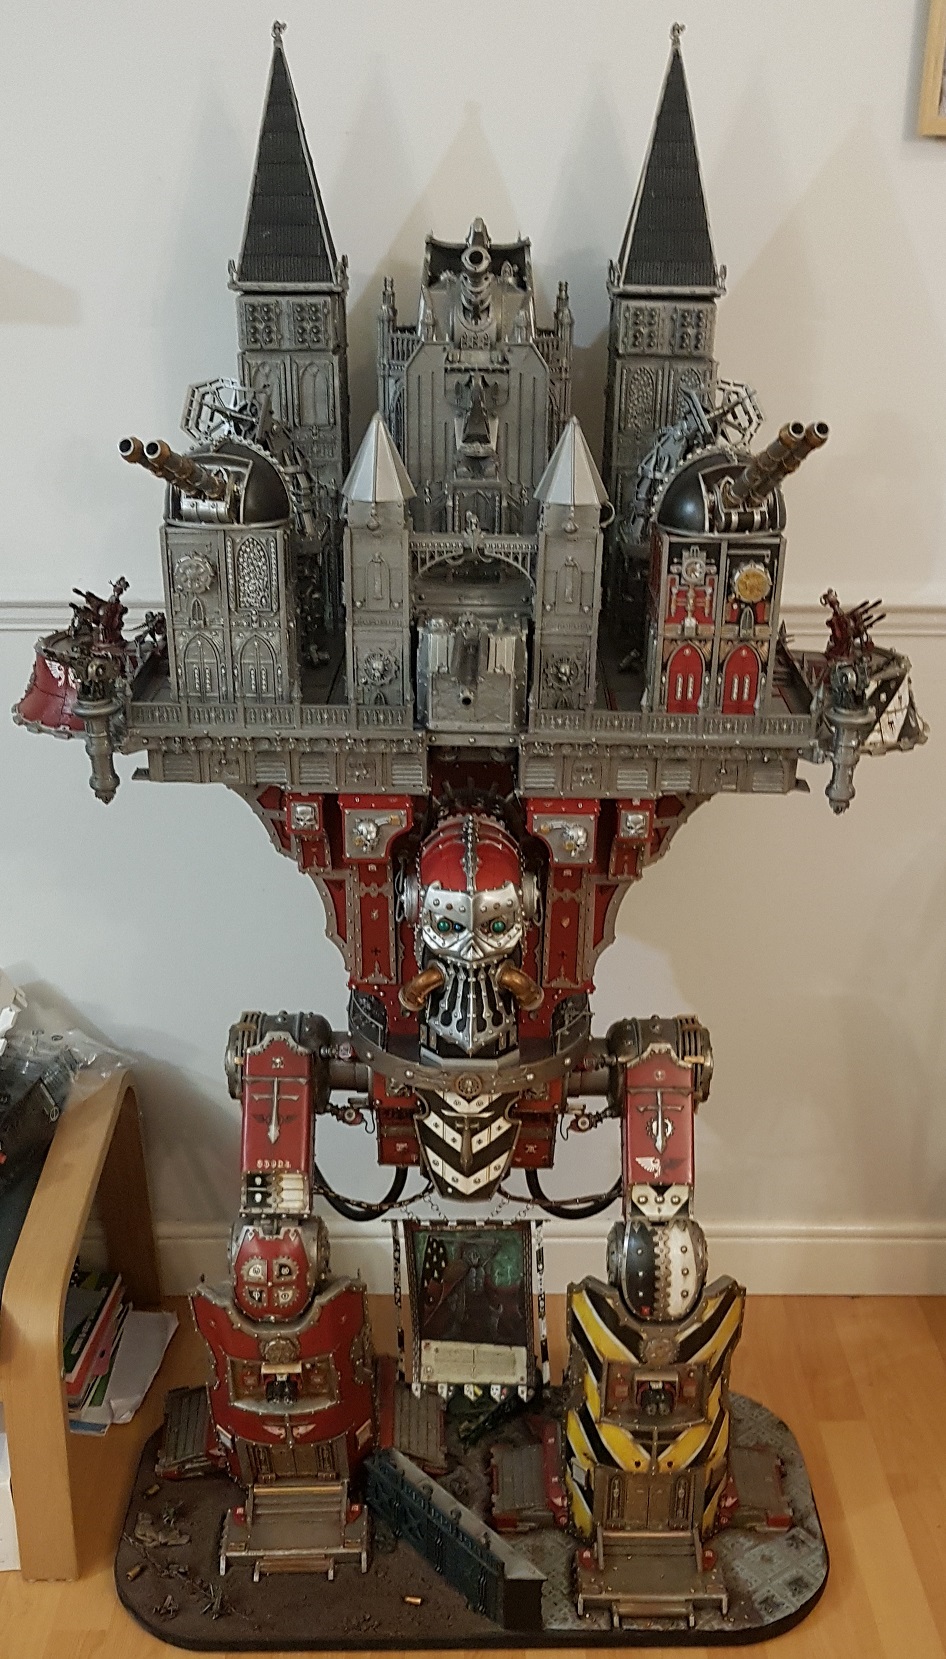
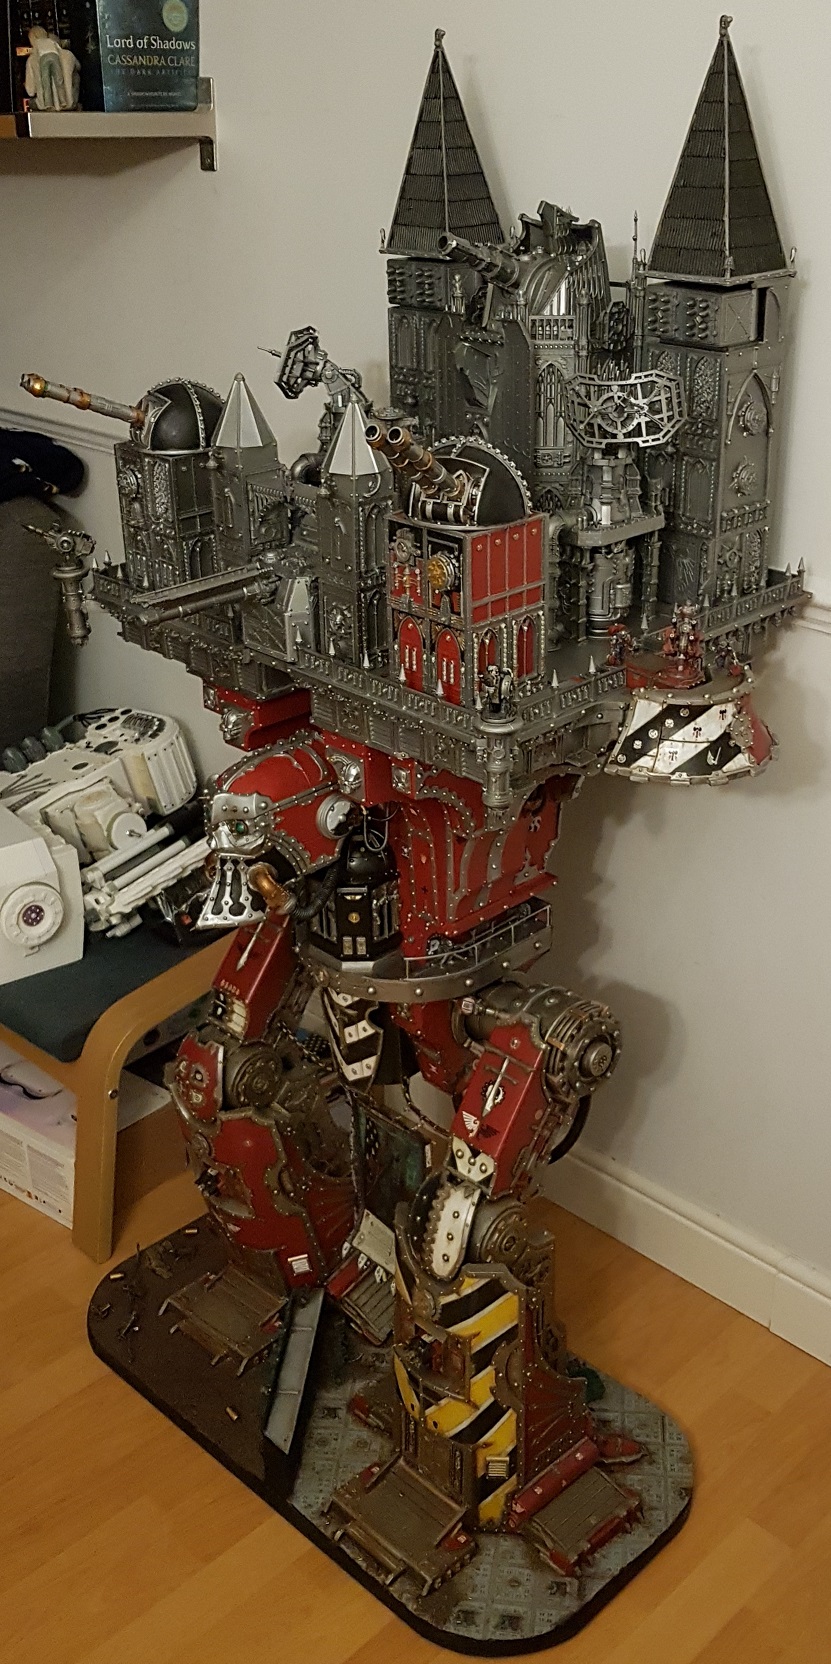
++This is Princeps Marlina Sevastin, MIU link engaged. Reactor levels holding, motivators ready, weapon systems standing by. For the glory of the Omnissiah, Ira Metallum walks!++In November 2022, Ira Metallum, my 28mm scale Imperator Titan finally made it to the field of battle at the Titan Owner's Club Walk 2022 in Milton Keynes.
 |
| Next to my reaver titan, Ferrum Dominus, Ira Metallum looks truly enormous! |
Before I document my final design chapter, I'll share a few highlights from the Titan Owner's Club walk - I also just wanted to say a quick thankyou to everyone who commented on, followed and encouraged me to complete this mammoth task! Special thanks to Phil T (Engine Phil - check his incredible painting out on Instagram!) who made some significant material donations to help fuel this rather hungry build project!
TOC Walk 2022
Fully built and assembled if not fully painted, she made her presence known, blasting apart and assisting in the destruction of no less than 3 warlord class and two reaver class battle titans. After three years of hard work, her debut was rather explosive!
 |
| What do a hundred titans look like? This. This is what they look like! |
 |
| Seeing Ira Metallum towering over everything else on the battlefield made it all worthwhile! |
 |
| As always, there were so many examples of incredible painting and modelling skill on display! |
Ira Metallum didn't have it all her own way though as on the second day of the event, the traitor forces focussed their fire in the latter half of the second day, proving that even a god machine can bleed - from the terminal pictured below, you can see that there was only a single point of damage left on her body!
I feel I also need to thank my opponents Luke and Simon for being exceptionally good sports despite taking a horrendous amount of punishment from the Imperator over the weekend!
 |
| A Warlord's eye view of Ira Metallum's imposing silhouette |
 |
| My trusty House Raven knights rode out in a brave vanguard strike, felling a traitor Warhound before being swallowed by the resulting explosion! |
 |
| House Raven were ably supported by Princeps Aaron's Legio Astorum Warhounds who bravely plunged into the fray! |
 |
| My Legio Metalica Walk banner with some fresh new kill badges! |
This will be my last mega update post now that the build phase has drawn to a close. My intention is to reduce the length of my posts again but increase their regularity. I found it hard to punctuate my Imperator posts because of the huge amounts of parallel effort being made on various sections. Once I've completed the remaining painting and oil washes, I'll make another post dedicated to showing off every section of the titan in more detail - a sort of virtual tour for everyone to enjoy!
Detailing the body and torso support columns
Even though I'd finished building all of the structural elements, the body still needed a lot of detailing before it could be called finished! I used a similar process to detail these areas as I did on the shin guards.
I measured the areas which needed detailing and recorded them onto graph paper so that I could draw up the designs.
 |
| The shoulder supports needed detail adding to the inside and outside of each strut, meaning that I would need to produce 8 identical sections |
 |
| As the shoulder supports were considerably simpler in terms of shape, I drew up and cut them individually as this would actually make the process quicker with no moulding time to worry about! |
 |
| The inner and outer support struts also needed detail plates. Four for the long inner struts (inside and outside), then four more outside detail plates for the shorter outer struts |
 |
| These are the strut designs I drew up on graph paper - I strengthened these with masking tape and used them as templates for drawing out masters |
 |
| Once I'd cut out the designs in Foamex, I created a shallow bed by gluing them to a flat plate, built walls then created a silicone mould which I could use to produce all the resin copies I needed |
 |
| Here are the resin copies after demoulding - they took a fair amount of cleaning up with sand paper and a knife |
 |
| Once cleaned up, the details plates were glued in place. The inner detail was stripped back to just the aquila emblem as the border clashed with the reactor detailing and I didn't want to pull attention from the rear platform which would be having crew added at a later date |
 |
| Once all of the detail plates were in place, I filled any gaps and added additional details such as half cogs and fleur de lis as necessary |
 |
| On the front faces of the main support struts, I added styrene strips and other details for trim, then filled any further gaps (a constant theme with this build...) |
 |
| I had to do most of this work with the body section upside down in order to reach the bottom areas. Even though they'd be rarely seen, it was important to me that every square inch was perfectly detailed. This adds a level of authenticity and scaling to a huge build |
 |
| In these images, you can see the cog trim details and access hatch for crew to reach the hip platform on each side of the body. I like to endure that any area which crew occupies is accessible by a hatch or ladder. They can't just teleport up there after all! |
 |
| And in this image, you can see my trusty rivet box. Almost every rivet on the Imperator was painstakingly placed by hand. This is the downside of being very focussed on minute details! |
Rivets
Rivets. I love them. They break up large surfaces, give scale to panels and add depth to the shallow raised details such as the aquilas on the support struts.
Rivets. I hate them. They take forever to apply and require 100% attention otherwise they can end up all over the floor.
Love or hate them, I applied a LOT of rivets to the Imperator. Just because I'm an obsessive loon, I went back and counted the rivets which I applied (to the nearest 10). I think I may have dreamt of rivets during the week I spent detailing the body...
| Shins | 320 |
| Inner legs | 120 |
| Leg armour plates | 130 |
| Pelvis | 150 |
| Head | 260 |
| Body | 750 |
| Carapace | 400 |
| Buildings | 160 |
| Hellstorm | 420 |
| Starshatter | 580 |
| Total | 3290 |
Carapace details
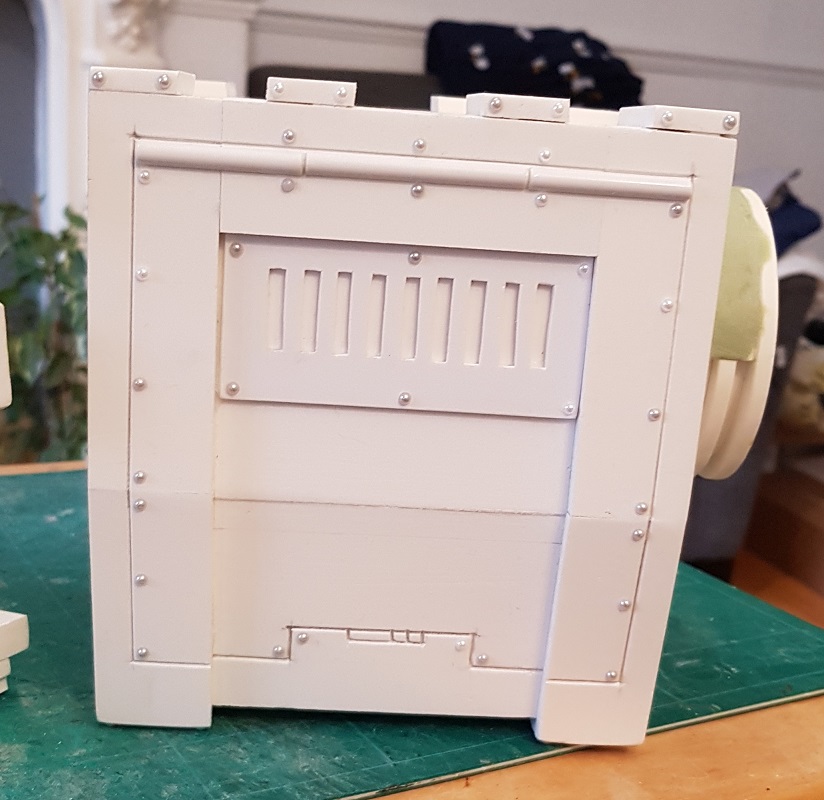
The large flat carapace required detailing as much as any other section of the titan, but given the fact that it is a structural component, its shape is out of necessity fairly bland and boxy. It took me quite a long time to come up with a detail scheme which was interesting while not overwhelming other areas.
 |
| I settled on small support pillars punctuated by imperial knight face plates for decoration. I produced two pillar designs, one with an Aquila and one with a Titanicus T which I duplicated with a silicone mould. |
 |
| Once I had enough pillars, I carefully measured the lengths which needed to be covered and worked out the best increments before making master runs which I then prepped for moulding* |
And this is the point where things went slightly wrong. I normally use the same type of silicone and have never had curing issues in the past. When I did this pour however, the mix just wouldn't set. Unfortunately, this meant that my master components were now completed covered with an uncured silicone mix which couldn't be washed off.
Luckily, I managed to get most of the congealed slop out of the mould, leaving only a viscus residue over the surface. I painted neat catalyst over the surface of the silicone residue and thankfully this cured over a 12 hour period. I was concerned that the heat of adding too much catalyst to the silicone might warp my master, but thankfully it was thin enough to just form a tough skin which I then cleaned away carefully with a scalpel.
 |
| The failed silicone pour residue with neat catalyst painted on |
After working back through the steps which I had taken to produce the mixture, I remembered that I had used latex gloves (which I normally only use for low viscosity liquids such as resin as they are easier to spill). When I investigated further, I found that contact with latex in any form can cause condensation curing silicone to fail. Armed with this very useful piece of information, I made sure that I didn't repeat the same mistake and vowed to share this information on my blog so that other model makers can potentially avoid this expensive mistake as well!!
 |
| The cleaned up master mould with new walls |
 |
| The successful MKII Silicone mould - notice how it doesn't melt into jelly? That's how you know it worked :) |
 |
| And the successfully cast first run of the resin components - I did six pours in order to give me the correct number of plates |
 |
| The Support strut plates were placed under the main carapace platform ridge |
 |
| The front sections were deliberately just support struts with gaps... |
 |
| ...so that Armiger class knight masks could be placed there! |
 |
| I punctuated the Armiger masks with terminal marker tokens as a nod to Adeptus Titanicus |
 |
| The closely spaced struts were made for the inner shoulder area which to can see here |
 |
| The back rear section housed the Questoris class knight heads which would be receiving face plates at after painting |
 |
| The rear of the titan also received the same treatment |
 |
| The assorted Knight face plates which will adorn the carapace |
Shoulder Armour
I've said it before and I'll say it again; compound curves are definitely the hardest thing to get right. So I completely ignored that fact and planned curved armour for the shoulder armour plates! What can I say? I'm a glutton for punishment!
 |
| I did a lot of different design sketches to get an idea of how I wanted the armour plates to look |
 |
| This is a slightly more developed sketch which helped nail down some of the shapes and details |
 |
| I started with top and bottom plates, then made support columns to help dictate the curved shape I wanted. The rear curve was made with a thin section of styrene |
 |
| The armour plates had to have a cut out for the AA gun emplacements (which slot in to cover the arm screws) so I had to keep testing and adjusting them during the build process |
 |
| The basic skeleton came together fairly quickly once I'd cut all of the components |
 |
| The underside of the plates has structural bars so that they tied in with the shoulder support struts |
 |
| The next step was to shape some Worbla thermoplastic over the frame. I used scraps to start building up the top rims as Worbla re-bonds when heated |
 |
| After sculpting the top rim with epoxy putty, I applied Isopon filler to the main curve |
 |
| I sanded and refilled the curves a couple of times to make sure the surface was consistent and smooth |
 |
| I etched the panel lines intro the surface with an awl and a steel ruler |
 |
| The overall fit was good, so I moved on to detailing and building the connecting socket as the plates would be sat higher on the shoulder |
 |
| Resin details and trim were added to the surfaces and a kickplate platform was placed on the top with a nice half-round rim |
 |
| The final detail was micro rivets - I hand drilled the rivet holes then inserted 1mm steel bearings with Super glue. This was fiddly and annoying, but really sells the scale of the armour plates |
 |
| After adding plastic rivets, the whole piece was sealed with mod-podge as this soaks into the porous filler strengthening it to prevent chipping and giving a nice surface to take paint. This also seals the steel bearings in place as they have a tendency to pop out if knocked too hard |
 |
| I built an inner wall on each plate which slots over a plug on the shoulder, locking the plates in position |
 |
| Sprayed silver and with servitor crews, the plates really came together |
 |
| Once panted, I permanently attached the servitor crewmen to the plates - they have the unenviable job of reloading the AA gins! |
 |
| Overall, I think the shoulder armour plates work fantastically! |
Point defences
An enormous walking armoured bastion needs to be defended. In addition to Ira Metallum's 2 primary and 6 secondary hardpoints, she also sports a plethora of point defences consisting of:
- Two shoulder mounted AA quad autocannons
- Two forward facing carapace mounted Icarus Lascannons
- Two forward facing underslung carapace mounted gatling cannons
- Six emplaced heavy bolters - three on each carapace side facing
- Three rear facing storm bolters - two on the carapace and one on the rear of the pelvis
- One rear facing underslung carapace mounted gatling cannon
- Two rear facing volkite culverins
- Four hip situated servitors armed with heavy stubbers - two on each side facing
As a result, there is no way to approach the Imperator without being within at least one, if not multiple overlapping fields of fire. Good luck assaulting Ira Metallum with infantry! :)
 |
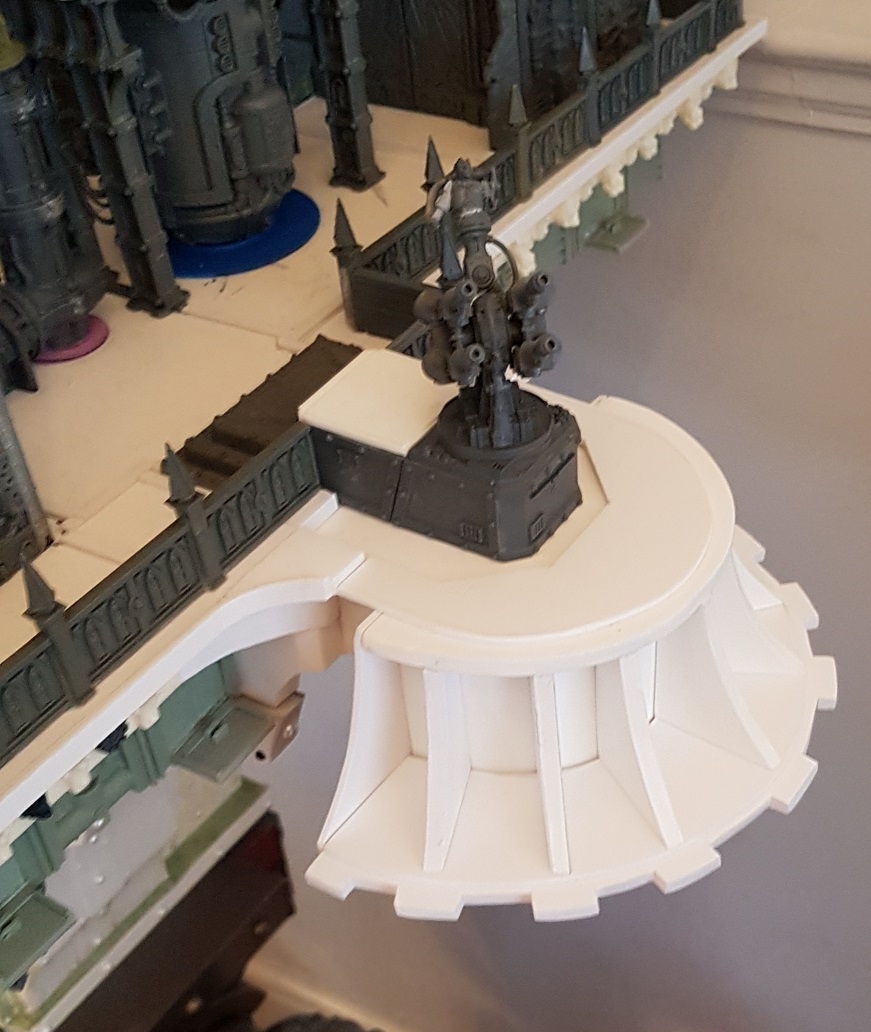
| The forward facing gatling cannons are converted imperial knight weapons on magnetic plates for easy removal and transport |
 |
| Each gatling cannon can be pivoted to bring the enemy into its sights |
 |
| The rear facing gatling cannon, volkite culverins and storm bolters were also magnetised for transport |
 |
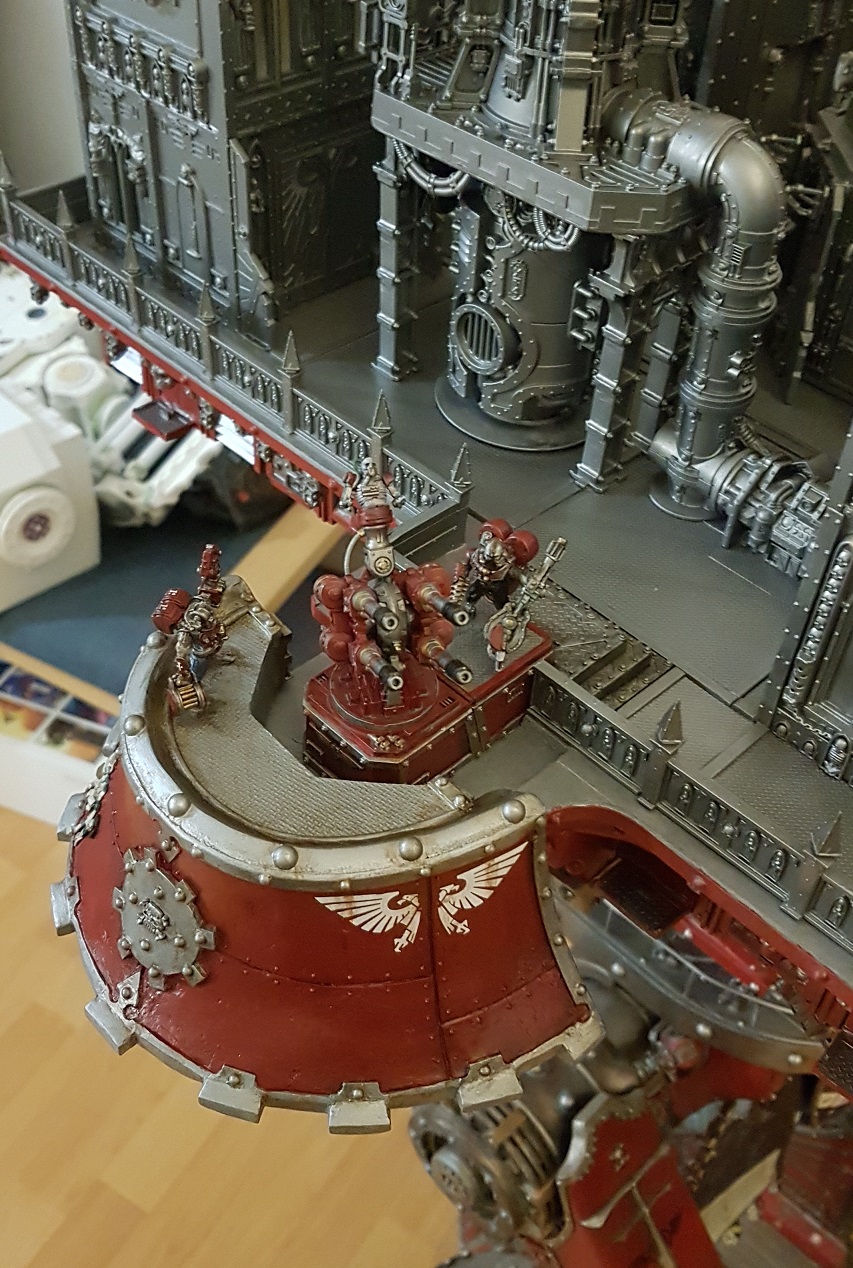
| I really enjoyed painting the point defences! |
 |
| They were painted with Mechanicum / Metalica themed black and white plates so that they would stand out from the red titan body |
 |
| Once I'd done the basic colours, I had the fun most stage to do - adding heat staining to the barrels! |
 |
| The painted rear facing weapons in place - you can also just about see the pelvis mounted storm bolter if you look carefully! |
 |
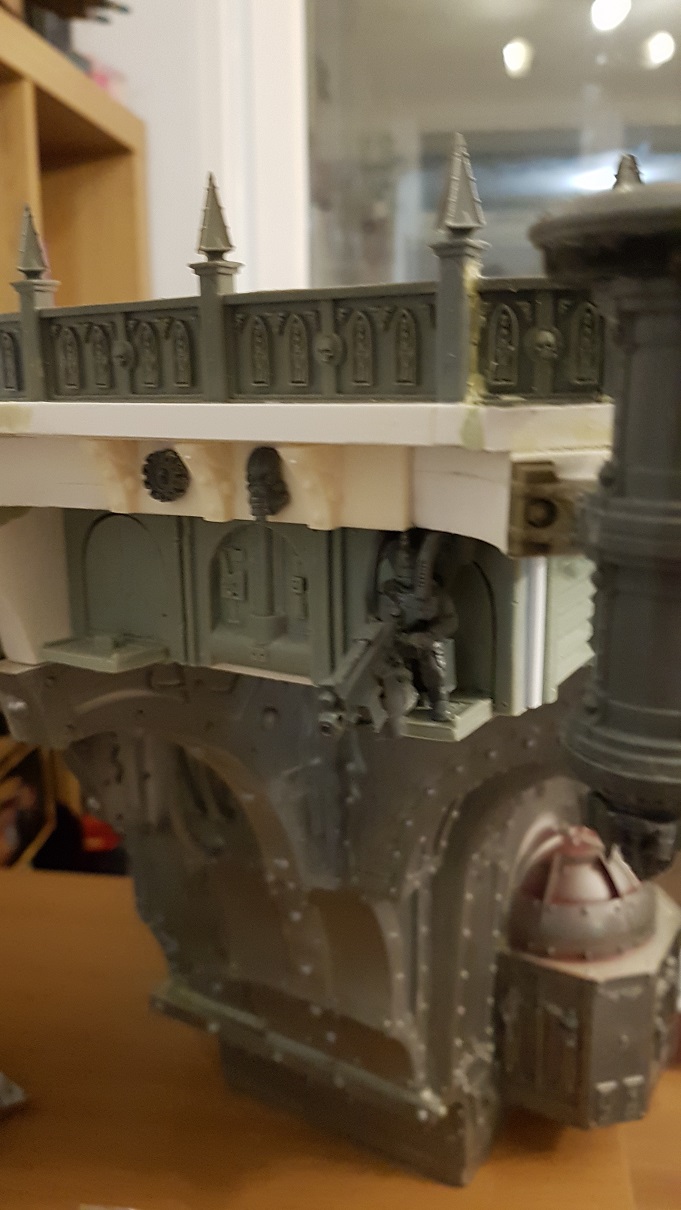
| The skitarii manned heavy bolter hatch emplacements under construction |
 |
| Each skitarii has his own hatch and platform so that they can re-enter the titan if it starts taking heavy fire |
 |
| I like to think this is one of the most terrifying jobs in the Imperium... |
 |
| The stubber servitors and their attendant loading servo skulls would be mounted on these floor sections which slot into the titan's hips |
 |
| These platforms were made from styrene with a steel wire frame inside the railings to add some strength for handling |
 |
| The two vignettes in place on the titan's hips |
 |
| Behind the servitors, you can see the entry hatch mentioned earlier |
 |
| Each platform vignette is a single piece which slots into the hips |
 |
| I was especially pleased with the loading servo skulls! |
 |
| All point defences in place! |
 |
| As with the stubber servitors, the loaders are attached to this single-piece vignette |
 |
| I thought integrating the gunnery servitors into their AA guns was very in tune with the Mechanicum! |
Towers
I won't go into immense detail on the process of constructing the carapace towers as they were mainly built from various Citadel building components procured over the last decade. Thanks to the modular nature of the Games Workshop building kits, making various different configurations was relatively easy.
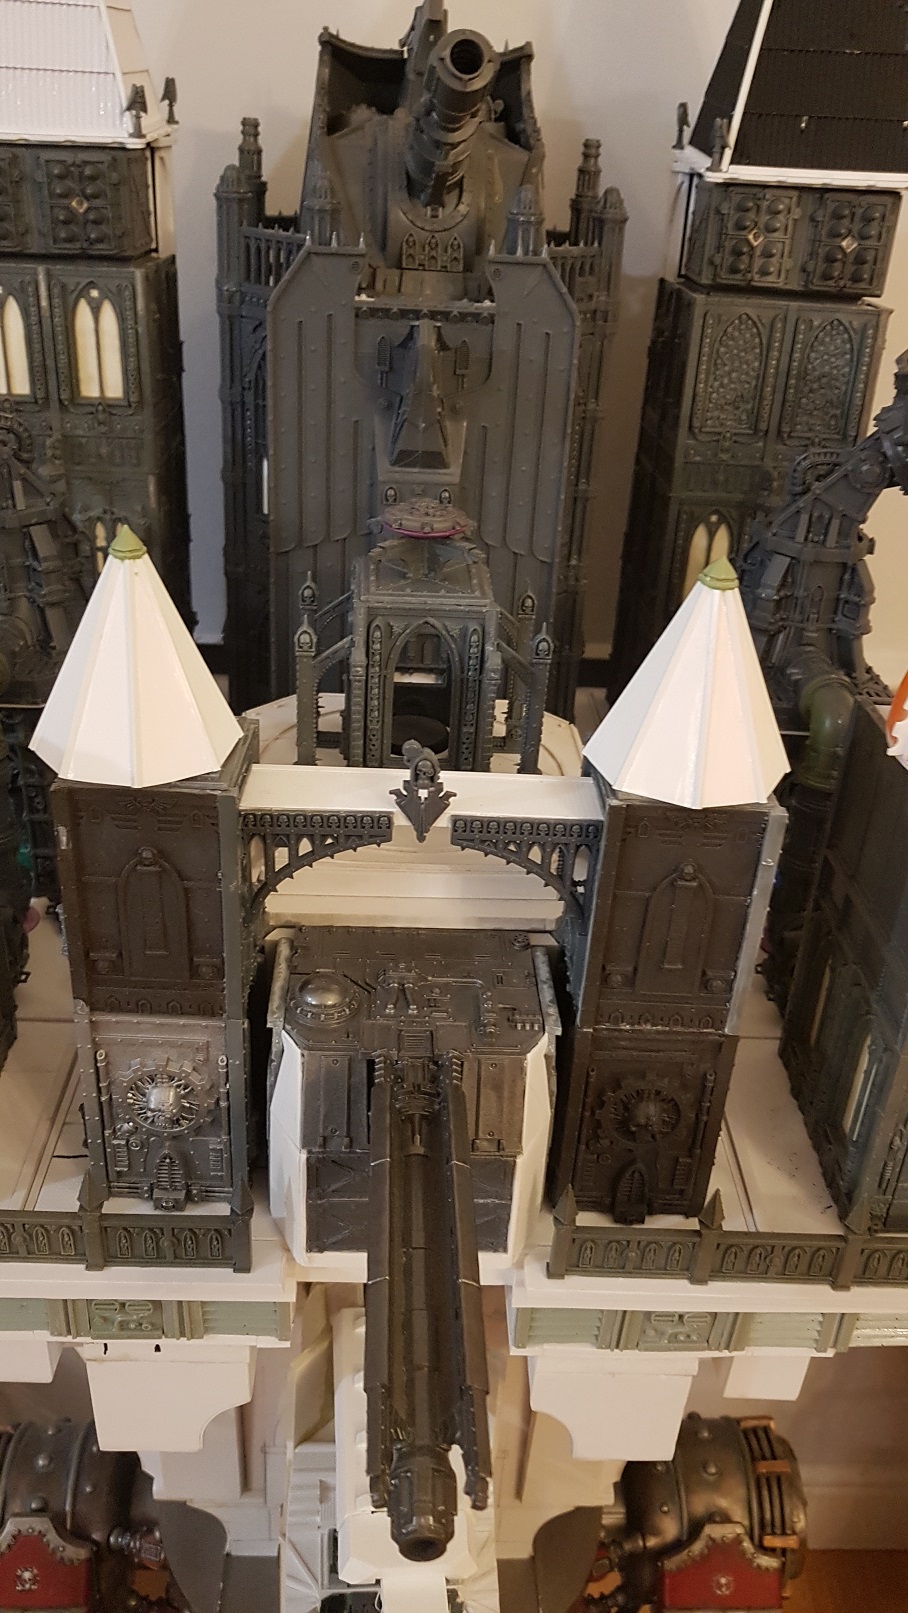
Working out the tower heights to maintain the classic Imperator silhouette was crucial. In addition to the aesthetics, it was also important to make sure that each weapon system had a clear field of fire over the forward turrets. The newly released radar towers were released at just the right time to be incorporated - I think they look brilliant nestled in amongst the other towers.
Each tower has its own footprint plate which slots into the carapace like a jigsaw piece. The tower plates all have their own specific slots, locking them all together for extra stability.
 |
| Although it has a footprint, the Strategium (the centre building) lifts away to reveal an interior. |
 |
| Each of the base plates has kickplate, trim dividers and space for deck crew (which will be added after painting is complete) |
 |
| How tall is Ira Metallum? Exactly 5 feet (60 inches or 153cm) to the top of the tallest tower |
Void Shield Generator Emitters
Ira Metallum is dotted with Void Shield Generator emitters - eleven to be precise:
- One on each shin pad (2)
- One on each Turbo Laser turret (2)
- Two on each of the rear Apocalypse Missile Launcher towers (4)
- One on each of the arms (2)
- One atop the Strategium (1)
Some of the VSG emitters needed a mount in order to be fitted to the titan. Rather than producing them individually, I decided to make a single mount and add it to the carapace column mould to save on materials and time!
 |
| The master and silicone mould |
 |
| 4 emitter mounts fresh out of the mould with a VSG emitter for testing |
 |
| All cleaned up and mounted on the tower sides, I was very happy with the final look! |
Strategium
As previously mentioned, the Strategium lifts away to reveal a busy tactical command centre. From here, the collected Imperial commanders can issue orders to support troops as well as analysing the battlefield for the best firing solutions!
 |
| The Volcano Cannon was built with a housing block which plugs into the gap between the Strategium arches with the intention of permanently fixing it in place once fully painted |
 |
| Atop the Strategium is a small folly which will contain the Skitarii statue on the left. On the right is the holographic image which is being projected inside the Strategium |
 |
| To make the tower tops for the arches, I first drew out the design on graph paper, strengthened it with masking tape and sticky back plastic, then cut it out two from sheets of styrene. Assembling the tower tops was a little tricky, but got easier once I'd glued a couple of the plates together. |
 |
| The arch and forward facing volcano cannon was designed to resemble the original Epic scale Imperator design |
 |
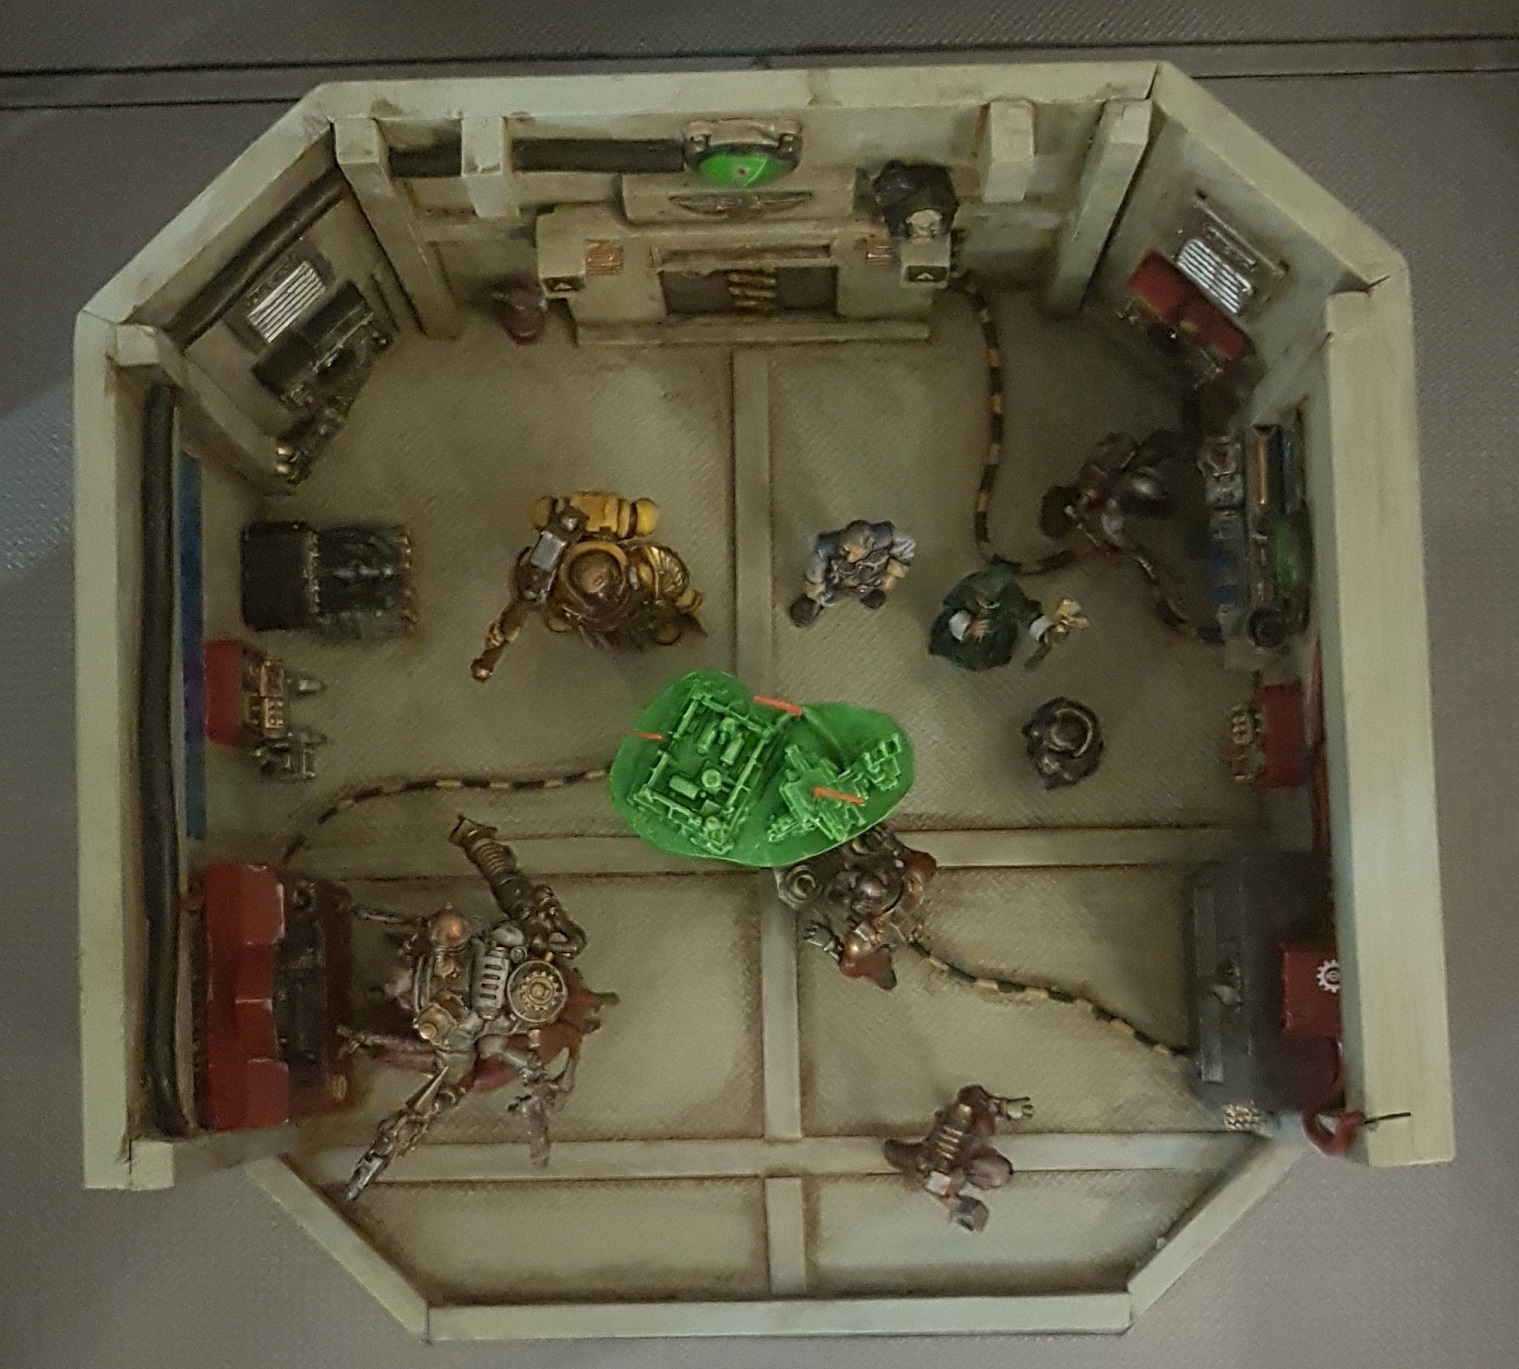
| The Strategium interior prior to painting. The figures were placed in various test positions to make sure I was happy with the layout |
 |
| The internal and external Imperator crew |
 |
| The Telepath, Astropath and Fleet Officer painted and ready for the Strategium |
 |
| No command staff would be complete without the wisdom and tactical acumen of an Adeptus Astartes captain |
 |
| I fully painted the interior of the Strategium before placing the painted command staff |
 |
| I even snuck a poster onto the wall showing blueprints of other titan classes |
 |
| The completed Strategium interior with Techpriest and servitors manning their stations |
Head
The head of the Imperator went through a few different iterations during the planning phase, but several features stuck. I wanted to keep the grill-like mouth section which was so synonymous with the original Epic design. I also wanted large pipes to break up the mouth and add some visual interest. I also wanted to try and make an updated version of the typical Legio Metalica helmeted skull which is such a great symbol of the legion.
These factors led me to produce several different sketches which I have posted previously on my blog, but thought I'd show them again as a reminder...
As I had previously built the basic shapes, the next step was to start forming the outer layers. I used cling film to make sure the putty didn't bond the surfaces which needed to separate once it had cured.

 |
| The top section would need to lift away in order to view the crew inside |
 |
| I used a thick layer of putty to bulk out the top of the head and give a solid base for the next stage |
 |
| I wasn't happy with the first iteration of the face plate so I sanded it back to a better basic shape and started to reform the features again with more putty |
 |
| After deciding that the neck magnets were not going to be strong enough, I chose to make a mechanical lock to fit the head to the body. I cut the above shape so that the large bolt head I'd inserted into the head would slot through, then with a twist the head would lock into place in a centred position. |
 |
| This first layer of putting was left to cure in place before the next stage could begin |
 |
| Next I cut the basic shape of the side panels and measured the right angled gap I'd need to cover with a herringbone frame |
 |
| The frame was glued in place to provide grip for the rest of the head and provide some internal detail once the roof was completed. Note the notches which were there to ensure the lid would hook over the side panels |
 |
| Before adding the herringbone frame, I re-sanded the top putty layer again |
 |
| The next phase was to re-coat the entire skull lid with car body filler, including the herringbone frame. Once cured, I sanded this down again for a nice rounded shape |
 |
| While the top of the skull was curing, I also filled and refined the area around the back of the jaw which would connect to the removable side panels |
 |
| It's worth noting at this point that I had deliberately constructed the stair cases on each side to incorporate a key shaped void underneath - I recreated these shapes in relief on the inside of the side panels to ensure that they always lined up correctly when the key shape slotted in |
 |
| I lost count of how many times I filled and sanded the head to get a the shapes I wanted... |
 |
| I even had to build a little stand to keep the head upright while I worked on it! |
 |
| The real fun could begin once the main outer areas were locked in and no longer structurally changing - working on the internals details such as monitors, controls and cabling!! |
 |
| Meanwhile, on the outside of the head, the hose was connected and I was building up the face detail |
 |
| In my initial design the top section had a large aquila across the forehead which was supposed to resemble a helmet visor |
 |
| I used masking tape to keep the panels in place while I added further layers of epoxy putty to the dome of the head |
 |
The round ear plugs on the side of the head cover the hidden join between the removable panel and the back of the head as well as incorporating magnets which hold the panels in place
|
 |
| Now that the basic shapes were complete, I began to add details, panel lines and trim as well as filling minor gaps where the removable parts joined the main structure |
 |
| I reworked some parts from spare aquila casts to make the basic mouth grill shapes - these were later filled and refined with putty, but gave me a good hard edge to work against |
 |
| I built up the inside of the head dome to strengthen it and fully incorporate the herringbone supports into the roof |
 |
| A shot of the magnetised hidden seam opened up |
 |
| At this point, the head really felt like it was coming together |
 |
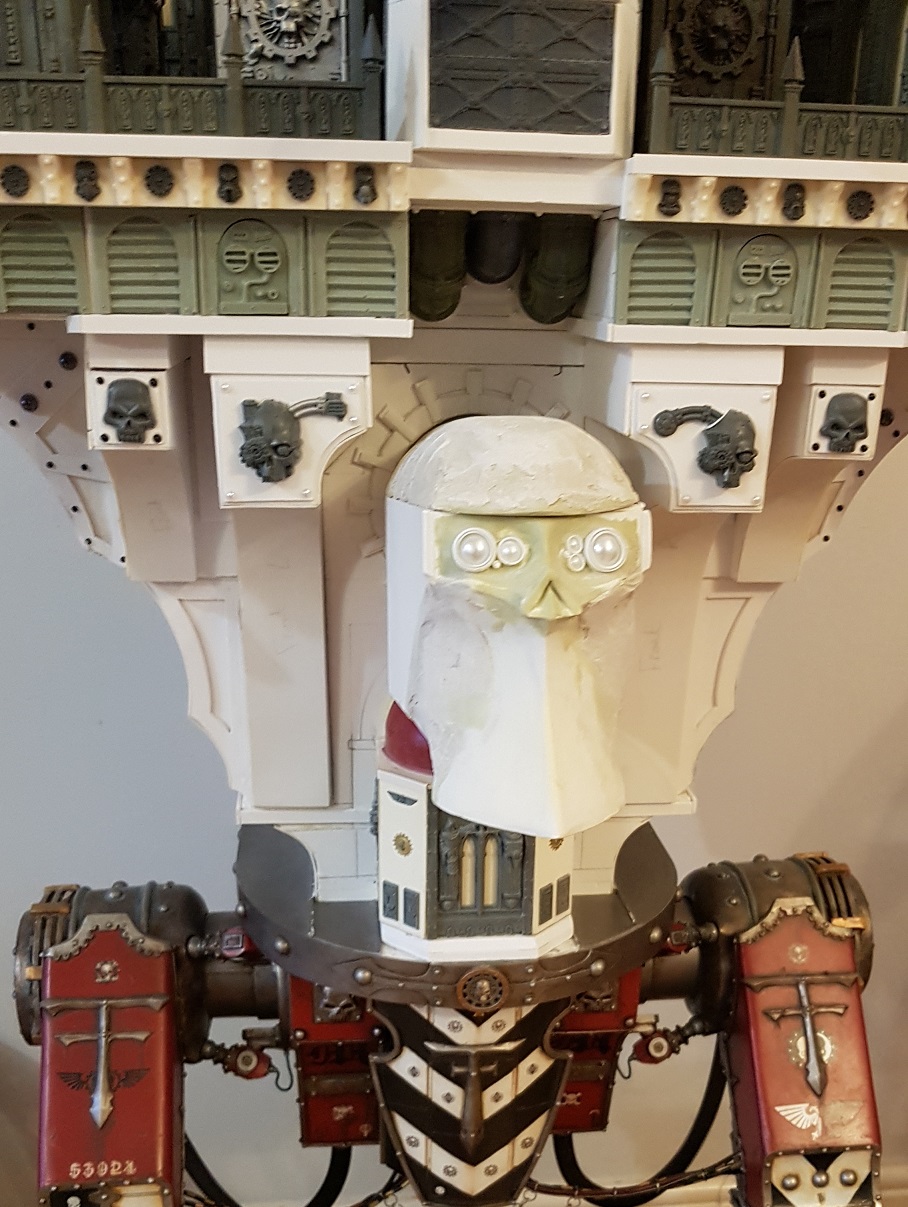
| Attaching the head to the body now gave the focal point it was missing |
 |
| It's also worth mentioning that I had built two rectangular magnets into the head with ports for the flexible cables I'd added to the body. Once the head is locked into position, the cables simply click into the sockets |
 |
| And this is the first picture after I finally bit the bullet and completely removed the aquila visor from the head. It looked less like a decorative symbol of power and more like some ridiculous bushy eyebrows. A nice flat visor worked much better - I just had to admit to myself when the original design wasn't working! |
 |
| The Imperator head next to my Warlord and Epic Imperator heads for scale |
 |
| I kept an original Epic scale Imperator titan head handy to make sure I didn't lose sight of the look and feel of the original design |
 |
| Even though my take on the Imperator is different from the original, I feel like it bridges the gap between the illustrious old miniature and the more modern design aesthetic now seen in the Forgeworld titan designs (yes, I am patting myself on the back) |
 |
| I must admit that the head is the section I'm most proud of out of the entire build |
 |
| And with the addition of hundreds of rivets, the head was finally complete! |
 |
| Another shot showing the cable connections |
 |
| With a nice coat of silver spray, the head finally looks like a professional model! |
 |
| Painting was pretty straightforward as I followed my typical Legio Metalica recipe |
 |
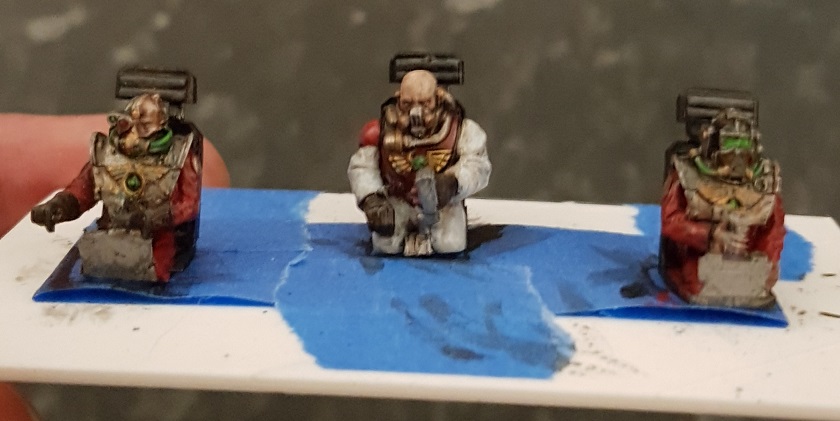
| The Steersmen were painted outside of the cockpit so that I could get to all of the details |
 |
| I tried to vary their uniforms slightly from the previous crews I'd painted |
 |
| Each of them was graced with the holy symbol of the Omnissiah on the back of their seats |
 |
| The painted and oil washed head complete at last! |
 |
| The Imperator head makes the Warlord look miniscule! |
 |
| As I'd added a lot of physical detail to the surfaces of the head, I dialled back the use of decals, adding only a few to each side |
 |
| Incorporating the Opus Titanicus into the top of the head was a little tricky, but it's really distinctive when viewed from above. You can also just about see the tiny warning decals next to the rear vents too - safety first kids! |
 |
| Princeps Marlina Sevastin herself, suspended by a mechanical arm due to her atrophied body - Marlina has served as princeps for a very long time. Soon she will need to be moved to a full amniotic tank... |
 |
| Unable to eat or breathe on her own, the princeps is now hard wired into the titan |
 |
| Lights and aquila heads decorate the ceiling either side of the Princep's transportation rail |
 |
| Suspended from the ceiling, Princeps Sevastin closely observes every tactical display |
 |
| The Princeps is suspended directly above the Steeersmen and has her own set of elevated consoles and controls |
 |
| The Princep's main centre console actually mirrors the tactical hologram being viewed in the Strategium... |
 |
| I like the idea that the higher in rank you are, the higher you sit physically within the Titan's bridge. The steersmen as the juniors, followed by two Moderati on the first level, the senior Moderati on the second level and the Princeps above all of them! |
 |
| The three Moderati are all very distinctive - I wanted them all to look quite different from each other - they're not clones after all! |
Hellstorm Cannon Arm - and an ill-fated slip
Due to time constraints, I wasn't able to incorporate the motor into the Hellstorm Cannon arm after all. The barrels still spin, but for a number of reasons, I abandoned the gimmick in favour of completing the model on time for the TOC Walk.
And it all would have worked out if not for an ill-fated pumpkin carving accident involving a scalpel which left me with a horrendous injury on the palm of my left hand. I won't show pictures of the injury itself as it was pretty horrific - I ended up in A&E, a specialist hand clinic and eventually in surgery to have the muscles sewn back together - it was an extremely deep cut which left me with very little movement in my thumb.
 |
| My hand after three weeks worth of healing with stitches |
I've suffered injuries in the past, but nothing was more terrifying for me than the thought of potentially losing the ability to work with my hands. Creating things by hand is my one overriding joy in life and the thought of losing that to one accidental slip was devastating for me.
Thanks to our wonderful National Health Service who were absolutely amazing from start to finish, I was just about able to finish the Hellstorm Cannon build and base coat the titan before the Walk in November. The surgeon told me that I was very lucky to have missed the tendons in my hand and thankfully I have now recovered full mobility in my hand! So thanks to everyone who helped me on the road to recovery, you have no idea how much it meant to me!
Anyway, enough self pity! Here are the few images I took of the Hellstorm Cannon build in progress...
 |
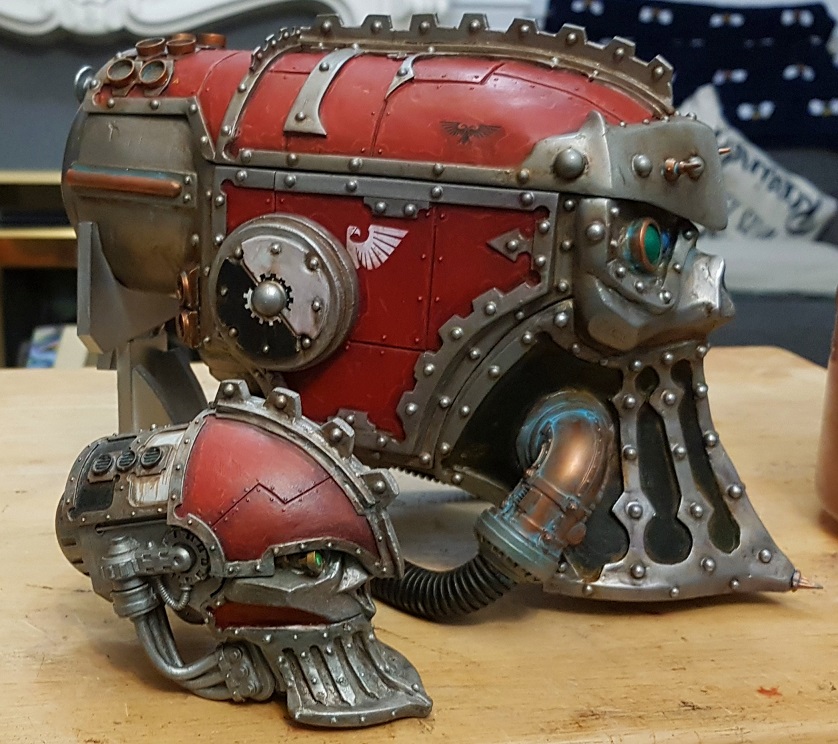
| The gigantic ammo hopper was built specifically to resemble the gatling blasters used on other titan classes |
 |
| As with the Starshatter Plasma Annihilator, I incorporated a large bolt into the arm connector where it would slot into the shoulder socket. |
 |
| The rest of the frickin' owl. Here is the main body of the cannon almost finished next to an Adeptus Titanicus scale Warlord Titan Macro Gatling Blaster. Note that this weapon arm stands taller than a 28mm scale Warlord Titan... |
 |
| Unfortunately, I didn't take any build pictures of the large armour plate which wraps around the cannon behind the elbow joint. I'll make sure that I feature this arm in detail when I do the virtual tour of the Imperator |
Painting the titan
Again, due to my hand injury, painting the titan was very slow and as a result, it wasn't entirely finished by the Walk deadline. Below are some shots of my painting progress - now that Christmas is out of the way, I can finish the job and promise to share some decent pictures soon! Thanks for reading as always!
*please note that I do not condone recasting - i.e. the complete reproduction of copyrighted IP. In this instance, I used cut down and converted knight heads to be used as mounts for the actual plastic face plates decorating the hull. Under these conditions, I consider the parts to be part of my own design process in the same way that I would use Styrene or Foamex. Although I store all of my silicone moulds for future use (repairs etc), they will never be used to produce parts for resale or any other purpose.


Once again, such a great read! Getting to know your thought process behind putting this beast together really is a gift. I love how the engine is coming along!
ReplyDeleteThanks matey! I know I tend to rattle on a bit in my blog, but I do like to share the journey of how I got to the finished project as it's such a long and detailed process!
Delete